
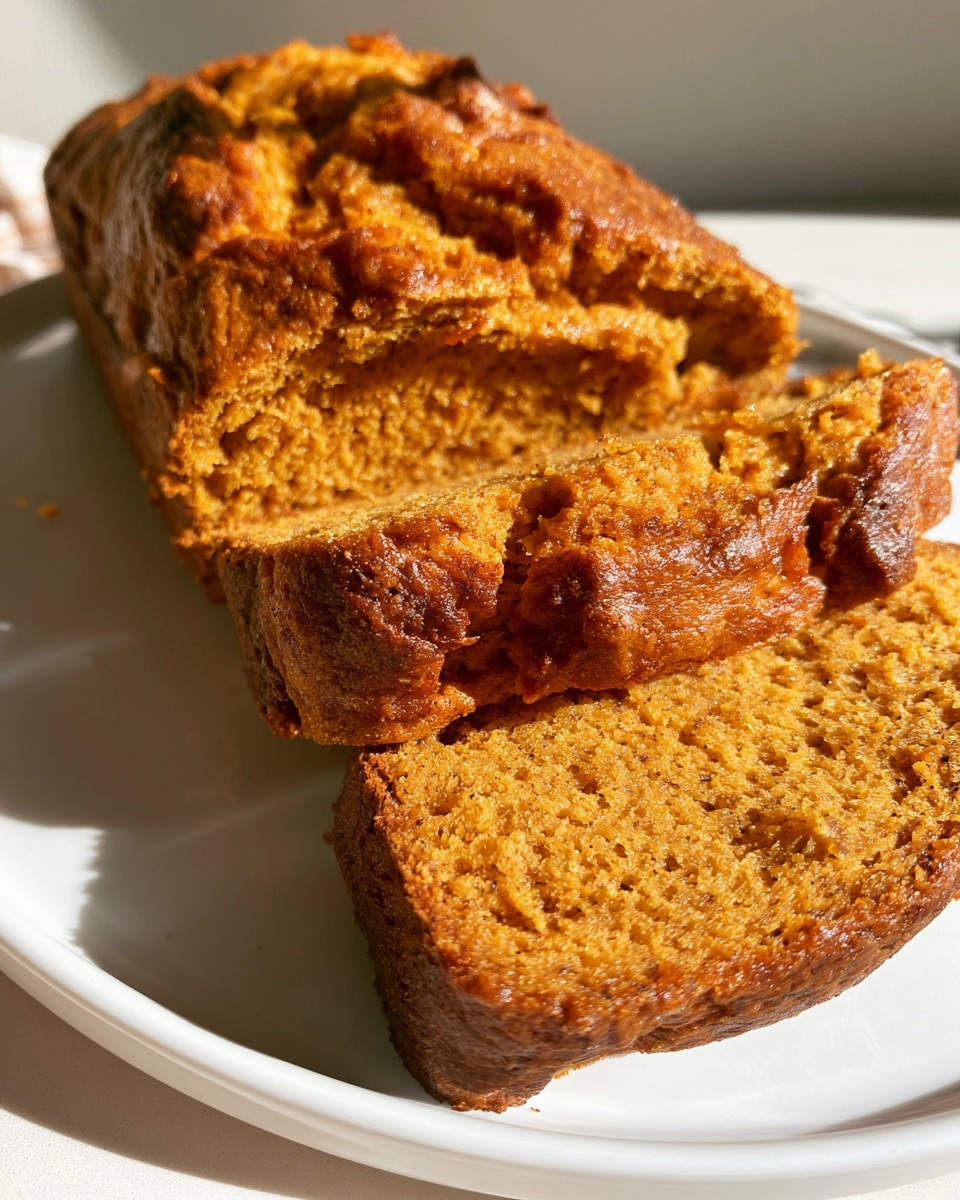
Gluten-Free Pumpkin Bread — The GF Pumpkin Loaf That Actually Rises
As the leaves turn and the air gets crisp, there’s nothing quite like the aroma of freshly baked gluten-free pumpkin bread wafting through your home. This delightful loaf is not only moist and flavorful, but it also rises beautifully, making it a perfect treat for busy moms and professionals alike. Whether you’re hosting a cozy gathering, preparing a snack for the kids, or simply indulging in a slice with your morning coffee, this gluten-free pumpkin bread is sure to impress. With its warm spices and tender texture, it’s a simple yet satisfying recipe that anyone can master!
Why You’ll Love This Gluten-Free Pumpkin Bread
This gluten-free pumpkin bread is a game-changer for anyone looking for a quick and delicious treat. It’s easy to make, requiring just a few simple steps that even beginner bakers can follow. The flavor is a delightful blend of warm spices and sweet pumpkin, making it a hit with both kids and adults. Plus, it’s perfect for meal prep! You can whip up a loaf ahead of time and enjoy it throughout the week, making busy days a little sweeter.
Easy to Make
With straightforward steps and minimal fuss, this recipe is perfect for those hectic days when you need a quick baking solution.
Delicious Flavor
The combination of pumpkin, cinnamon, and nutmeg creates a warm, inviting flavor that’s simply irresistible.
Family-Friendly
This bread is a hit with everyone, from picky eaters to adults, making it ideal for family gatherings or school snacks.
Make-Ahead Friendly
Prepare it in advance and store it for busy mornings or unexpected guests, ensuring you always have a delicious treat on hand.
Ingredients for Gluten-Free Pumpkin Bread
Main Ingredients
- Gluten-free all-purpose flour: The base of our bread, providing structure without the gluten.
- Pumpkin puree: Adds moisture and a rich pumpkin flavor, making the bread deliciously moist.
- Sugar: Sweetens the loaf, balancing the spices and enhancing the pumpkin flavor.
- Vegetable oil: Keeps the bread tender and moist, ensuring a delightful texture.
- Eggs: Help bind the ingredients together and contribute to the bread’s rise.
- Baking soda: Acts as a leavening agent, helping the bread to rise beautifully.
- Baking powder: Works alongside baking soda for extra lift, ensuring a fluffy loaf.
- Cinnamon: Adds warmth and depth of flavor, making each bite comforting.
- Nutmeg: Complements the cinnamon with its unique, aromatic flavor.
- Salt: Enhances all the flavors, balancing the sweetness of the bread.
Optional Add-Ins
- Chopped walnuts: Add a delightful crunch and nutty flavor to the bread.
- Chocolate chips: For a sweeter twist, fold in some chocolate chips for a decadent treat.
- Dried cranberries or raisins: Introduce a chewy texture and a hint of tartness.
- Spices: Feel free to experiment with ginger or cloves for a spicier kick.
Ingredient Notes
- Substitutions: You can use almond flour or coconut flour, but be aware that this may alter the texture and moisture levels.
- Recommended brands: Look for certified gluten-free flour blends like Bob’s Red Mill or King Arthur Flour for best results.
- Fresh vs frozen: Canned pumpkin puree works best for this recipe, but if using fresh, ensure it’s well-pureed and not too watery.
Kitchen Equipment
- Loaf pan: A standard 9×5 inch loaf pan works best, but any similar-sized pan will do.
- Mixing bowls: Use a large bowl for wet ingredients and a medium bowl for dry ingredients.
- Whisk: A whisk is ideal for mixing dry ingredients, but a fork can work in a pinch.
- Measuring cups and spoons: Accurate measurements are key for baking success.
- Spatula: A rubber spatula helps to fold in ingredients and scrape the bowl clean.
How to Make Gluten-Free Pumpkin Bread
Step 1: Prepare the Ingredients
Start by gathering all your ingredients. Preheat your oven to 350°F (175°C) and grease your loaf pan. This will ensure your bread doesn’t stick. Measure out the gluten-free flour, pumpkin puree, sugar, vegetable oil, eggs, and spices. Having everything ready makes the process smoother and more enjoyable!
Step 2: Mix or Assemble
In a large mixing bowl, combine the pumpkin puree, sugar, and vegetable oil. Mix them together until they’re well blended. Then, add the eggs one at a time, stirring well after each addition. In a separate bowl, whisk together the gluten-free flour, baking soda, baking powder, cinnamon, nutmeg, and salt. Gradually add the dry ingredients to the wet mixture, stirring gently until just combined. If you’re using walnuts or any other add-ins, fold them in now.
Step 3: Cook or Bake
Pour the batter into your prepared loaf pan, smoothing the top with a spatula. Place it in the preheated oven and bake for 50-60 minutes. You’ll know it’s done when a toothpick inserted into the center comes out clean. The top should be golden brown and slightly domed. Keep an eye on it towards the end of the baking time to avoid overcooking.
Step 4: Finish and Garnish
Once baked, remove the loaf from the oven and let it cool in the pan for about 10 minutes. This helps it set and makes it easier to remove. After that, carefully transfer the bread to a wire rack to cool completely. If you like, you can sprinkle some powdered sugar on top for a lovely finish!
Step 5: Serve
Slice the gluten-free pumpkin bread once it’s cooled. It’s delicious on its own, but you can also serve it with a pat of butter or a drizzle of honey for extra flavor. Enjoy it as a snack, breakfast, or dessert. Trust me, it’s hard to resist a warm slice fresh from the oven!
Expert Tips for Success
- Use Fresh Ingredients: Fresh pumpkin puree and spices make a noticeable difference in flavor.
- Don’t Overcook: Keep an eye on your bread; overbaking can lead to a dry loaf.
- Measure Accurately: Baking is a science! Use proper measuring cups for dry and wet ingredients.
- Follow Timing Carefully: Every oven is different; check for doneness a few minutes early.
- Common Pro Tips: Let the bread cool completely before slicing for cleaner cuts.
Recipe Variations for Gluten-Free Pumpkin Bread
Healthier Version
- Substitute half of the sugar with applesauce or a natural sweetener like honey or maple syrup.
- Use whole grain gluten-free flour for added fiber and nutrients.
- Replace vegetable oil with unsweetened applesauce or Greek yogurt to reduce fat content.
Vegetarian Version
- This recipe is already vegetarian-friendly! Just ensure that the eggs are from a humane source if that’s a concern.
- For a vegan option, replace eggs with flax eggs (1 tablespoon ground flaxseed mixed with 2.5 tablespoons water per egg).
Gluten-Free Version
- Always use certified gluten-free flour blends to avoid cross-contamination.
- Experiment with different gluten-free flours like almond or coconut flour, but adjust the liquid accordingly.
- Consider adding a teaspoon of xanthan gum if your flour blend doesn’t already contain it for better texture.
Spicy Version
- Add a teaspoon of ground ginger or cloves for an extra kick of spice.
- Incorporate a pinch of cayenne pepper for a surprising heat that complements the sweetness.
- Top with a spicy cream cheese frosting for a delightful contrast.
Extra Indulgent Version
- Fold in chocolate chips or chunks for a rich, sweet surprise in every bite.
- Drizzle a simple glaze made from powdered sugar and milk over the cooled bread for added sweetness.
- Top with a streusel made from brown sugar, butter, and cinnamon before baking for a crunchy topping.
What to Serve With Gluten-Free Pumpkin Bread
Side Dishes
- Serve with a fresh fruit salad for a light, refreshing contrast.
- Pair with a simple green salad drizzled with balsamic vinaigrette.
Sauces and Toppings
- Spread with cream cheese or butter for a rich, creamy addition.
- Drizzle with honey or maple syrup for extra sweetness.
Drinks
- Enjoy with a warm cup of spiced chai or pumpkin spice latte.
- A glass of cold apple cider complements the flavors beautifully.
Desserts
- Pair with a scoop of vanilla ice cream for a delightful dessert.
- Serve alongside a slice of pecan pie for a festive touch.
Storage Instructions
Refrigerator
- Store leftover gluten-free pumpkin bread in an airtight container at room temperature for up to 3 days.
- If you prefer, you can refrigerate it to extend freshness, but it may dry out slightly.
Freezer
- Wrap the cooled loaf tightly in plastic wrap, then place it in a freezer-safe bag or container.
- This bread can be frozen for up to 3 months without losing its delicious flavor.
Reheating
- To reheat, simply slice the bread and warm it in the microwave for about 15-20 seconds.
- For a crispier texture, toast slices in a toaster or on a skillet until warmed through.
Common Mistakes to Avoid
- Using the wrong type of gluten-free flour: Not all gluten-free flours behave the same, so stick to a blend designed for baking.
- Skipping the measuring: Baking is a science, and accurate measurements are crucial for the perfect rise and texture.
- Not checking for doneness: Relying solely on baking time can lead to overbaking; always test with a toothpick.
- Cutting the bread too soon: Allow the loaf to cool completely before slicing to prevent it from crumbling.
FAQs about Gluten-Free Pumpkin Bread
Can I use a different type of flour?
Yes, you can experiment with different gluten-free flours! Almond flour or coconut flour can be used, but keep in mind that they may alter the texture and moisture of the bread. If you choose to use these flours, you might need to adjust the liquid ingredients accordingly.
How do I know when the bread is done baking?
The best way to check for doneness is to insert a toothpick into the center of the loaf. If it comes out clean or with just a few crumbs attached, your gluten-free pumpkin bread is ready. The top should also be golden brown and slightly domed.
Can I add chocolate chips to the recipe?
Absolutely! Adding chocolate chips is a delicious way to enhance the flavor of your gluten-free pumpkin bread. Just fold them into the batter before pouring it into the loaf pan for a sweet surprise in every slice.
How long does this bread last?
Your gluten-free pumpkin bread will stay fresh for up to 3 days when stored in an airtight container at room temperature. If you want to keep it longer, consider freezing it, where it can last for up to 3 months without losing its delightful flavor.
Recipe Card for Gluten-Free Pumpkin Bread
| Prep Time | 15 minutes |
|---|---|
| Cook Time | 60 minutes |
| Total Time | 1 hour 15 minutes |
| Servings | 1 loaf |
| Calories | 180 per slice |
Ingredients
- 1 ½ cups gluten-free all-purpose flour
- 1 cup pumpkin puree
- ¾ cup sugar
- ½ cup vegetable oil
- 2 large eggs
- 1 tsp baking soda
- ½ tsp baking powder
- 1 tsp cinnamon
- ½ tsp nutmeg
- ½ tsp salt
- ½ cup chopped walnuts (optional)
Instructions
- Preheat the oven to 350°F (175°C) and grease a loaf pan.
- In a large bowl, mix together the pumpkin puree, sugar, and vegetable oil until well combined.
- Add the eggs one at a time, mixing well after each addition.
- In a separate bowl, whisk together the gluten-free flour, baking soda, baking powder, cinnamon, nutmeg, and salt.
- Gradually add the dry ingredients to the wet ingredients, stirring until just combined.
- If using, fold in the chopped walnuts.
- Pour the batter into the prepared loaf pan and smooth the top.
- Bake for 50-60 minutes or until a toothpick inserted into the center comes out clean.
- Allow to cool in the pan for 10 minutes before transferring to a wire rack to cool completely.
Notes
- Ensure all ingredients are gluten-free.
- Store leftovers in an airtight container for up to 3 days.
- This bread can be frozen for up to 3 months.
Gluten-Free Pumpkin Bread — The GF Pumpkin Loaf That Actually Rises
This gluten-free pumpkin bread is more than just a recipe; it’s a warm hug in loaf form! With its perfectly risen texture and delightful flavors, it’s bound to become a family favorite. Whether you’re enjoying a slice with your morning coffee or sharing it at a gathering, this bread brings joy to every occasion. I encourage you to try it out and experience the deliciousness for yourself. If you love it as much as I do, please leave a review or comment below. Your feedback means the world to me and helps others discover this delightful treat!
PrintGluten-Free Pumpkin Bread: Enjoy a Perfectly Risen Loaf!
A delicious and moist gluten-free pumpkin bread that rises perfectly, making it a delightful treat for any occasion.
- Prep Time: 15 minutes
- Cook Time: 60 minutes
- Total Time: 1 hour 15 minutes
- Yield: 1 loaf 1x
- Category: Baking
- Method: Baking
- Cuisine: American
- Diet: Gluten Free
Ingredients
- 1 ½ cups gluten-free all-purpose flour
- 1 cup pumpkin puree
- ¾ cup sugar
- ½ cup vegetable oil
- 2 large eggs
- 1 tsp baking soda
- ½ tsp baking powder
- 1 tsp cinnamon
- ½ tsp nutmeg
- ½ tsp salt
- ½ cup chopped walnuts (optional)
Instructions
- Preheat the oven to 350°F (175°C) and grease a loaf pan.
- In a large bowl, mix together the pumpkin puree, sugar, and vegetable oil until well combined.
- Add the eggs one at a time, mixing well after each addition.
- In a separate bowl, whisk together the gluten-free flour, baking soda, baking powder, cinnamon, nutmeg, and salt.
- Gradually add the dry ingredients to the wet ingredients, stirring until just combined.
- If using, fold in the chopped walnuts.
- Pour the batter into the prepared loaf pan and smooth the top.
- Bake for 50-60 minutes or until a toothpick inserted into the center comes out clean.
- Allow to cool in the pan for 10 minutes before transferring to a wire rack to cool completely.
Notes
- Ensure all ingredients are gluten-free.
- Store leftovers in an airtight container for up to 3 days.
- This bread can be frozen for up to 3 months.
Nutrition
- Serving Size: 1 slice
- Calories: 180
- Sugar: 10g
- Sodium: 150mg
- Fat: 8g
- Saturated Fat: 1g
- Unsaturated Fat: 7g
- Trans Fat: 0g
- Carbohydrates: 24g
- Fiber: 2g
- Protein: 3g
- Cholesterol: 30mg
About the Author

Marianne
kitchen guide and fellow food
Hi, we’re Marianne Hi there, and welcome to Recipes Days! I’m Marianne, your kitchen guide and fellow food lover. If you’ve ever felt overwhelmed by complicated recipes or thought, “I don’t have time to cook something good,” I’ve been there too. That’s why Recipes Days exists—to make cooking feel effortless, fun, and full of flavor, no matter your experience level.


