
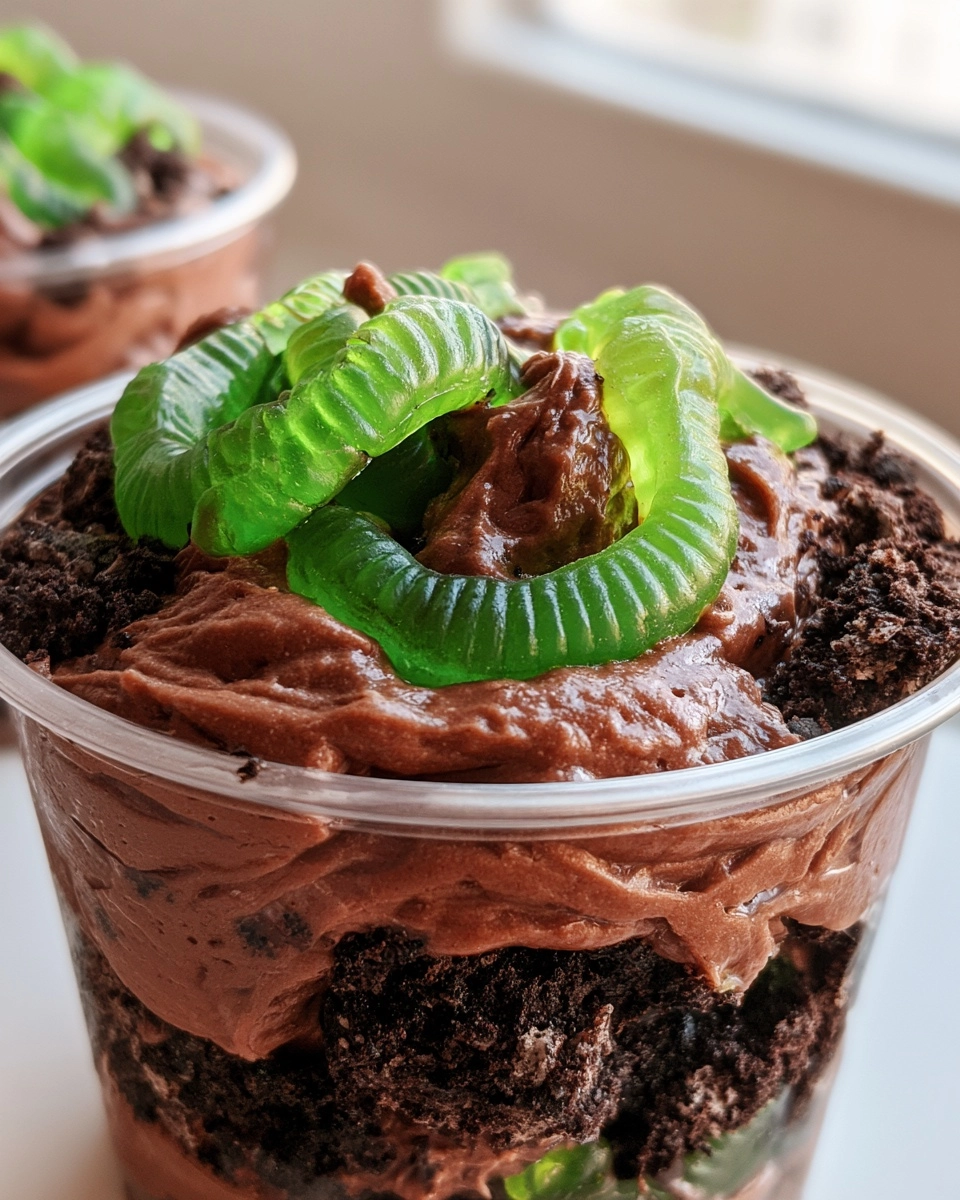
Halloween Dirt Cups — No-Bake Dirt Cups With Gummy Worms
As the leaves turn and the air gets crisp, it’s time to embrace the spooky season with a fun treat that’s sure to delight both kids and adults alike: Halloween Dirt Cups! These no-bake desserts are a quick solution for busy days, featuring layers of creamy chocolate pudding, crushed cookies, and, of course, gummy worms. Perfect for Halloween parties, school events, or just a fun family night, these cups are easy to whip up and even easier to enjoy. With a rich chocolate flavor and a playful texture, they’re a treat that brings smiles all around!
Why You’ll Love This Halloween Dirt Cups — No-Bake Dirt Cups With Gummy Worms
These Halloween Dirt Cups are a delightful treat that everyone will adore! They’re incredibly easy to make, requiring no baking at all, which means less time in the kitchen and more time enjoying the festivities. The rich chocolate flavor combined with the crunch of cookies creates a deliciously fun dessert. Plus, they’re family-friendly, making them a hit with kids and adults alike. Best of all, you can prepare them ahead of time, allowing you to focus on other Halloween activities!
Easy to Make
With just a few simple steps, you can create these delightful cups without any fuss. Perfect for busy moms!
Delicious Flavor
The combination of creamy chocolate pudding and crunchy cookies is simply irresistible.
Family-Friendly
Kids love the fun presentation, and adults appreciate the deliciousness. It’s a win-win!
Make-Ahead Friendly
Prepare these cups a day in advance, so you can enjoy the party stress-free.
Ingredients Halloween Dirt Cups — No-Bake Dirt Cups With Gummy Worms
Main Ingredients
- Chocolate instant pudding mix: This is the star of the show, providing a rich and creamy base.
- Milk: Used to prepare the pudding, it adds creaminess and helps achieve the perfect texture.
- Whipped topping: This lightens the pudding mixture, making it fluffy and delightful.
- Chocolate sandwich cookies: Crushed to create the “dirt” layer, they add a satisfying crunch.
- Gummy worms: The fun and spooky decoration that makes these cups a Halloween favorite!
Optional Add-Ins
- Halloween-themed candies: Consider adding candy corn or chocolate bats for extra flair.
- Sprinkles: Use festive sprinkles to add a pop of color and fun.
- Crushed nuts: For a bit of crunch, sprinkle some crushed nuts on top.
Ingredient Notes
- For a more intense chocolate flavor, opt for dark chocolate pudding mix instead of regular.
- Feel free to use low-fat or non-dairy milk if you prefer a lighter version.
- Whipped topping can be substituted with homemade whipped cream for a fresher taste.
- When choosing chocolate sandwich cookies, brands like Oreo are popular, but any chocolate cookie will work.
Kitchen Equipment
- Mixing bowl: A medium-sized bowl works well for mixing the pudding and whipped topping.
- Whisk: Use a whisk or an electric mixer for smooth pudding.
- Clear cups or bowls: Any clear container will showcase the layers beautifully.
- Spatula: A rubber spatula is great for folding in the whipped topping.
How to Make Halloween Dirt Cups — No-Bake Dirt Cups With Gummy Worms
Step 1: Prepare the Ingredients
Start by gathering all your ingredients. You’ll need chocolate instant pudding mix, milk, whipped topping, chocolate sandwich cookies, and gummy worms. Make sure your whipped topping is thawed and your cookies are crushed into fine pieces. You can use a food processor or place them in a zip-top bag and crush them with a rolling pin. This will create the perfect “dirt” texture for your cups!
Step 2: Mix or Assemble
In a mixing bowl, whisk together the chocolate pudding mix and milk until smooth. This should take about 2 minutes. Once it’s well combined, gently fold in the whipped topping using a spatula. Be careful not to deflate the mixture; you want it to stay light and fluffy. Now, you’re ready to layer your cups!
Step 3: Cook or Bake
There’s no cooking or baking involved in this recipe! Just focus on layering your ingredients. You’ll want to refrigerate the cups for at least 30 minutes after assembling. This chilling time allows the pudding to set and the flavors to meld together, making each bite even more delicious.
Step 4: Finish and Garnish
To assemble, take your clear cups or bowls and start layering. Begin with a layer of the pudding mixture, followed by a layer of crushed cookies. Repeat this process until you reach the top of the cup. Finish with a generous sprinkle of crushed cookies to resemble dirt. Finally, place a few gummy worms on top for that spooky touch!
Step 5: Serve
Once your Halloween Dirt Cups are assembled and chilled, they’re ready to serve! You can present them on a festive platter or let each person grab their own cup. These treats are sure to be a hit at any Halloween gathering, and they look adorable too! Enjoy the smiles as everyone digs in!
Expert Tips for Success
- Use Fresh Ingredients: Fresh whipped topping and milk will enhance the flavor and texture of your dirt cups.
- Don’t Overcook: Since this is a no-bake recipe, focus on mixing rather than cooking. Just ensure your pudding is smooth.
- Measure Accurately: Follow the measurements for pudding and milk closely to achieve the right consistency.
- Follow Timing Carefully: Allow the cups to chill for at least 30 minutes to set properly.
- Common Pro Tips: Use a clear container to showcase the layers, and don’t hesitate to get creative with toppings!
Recipe Variations
Healthier Version
- Use sugar-free chocolate pudding mix and light whipped topping to reduce calories.
- Substitute crushed whole-grain cookies for a healthier crunch.
- Add fresh fruit like raspberries or strawberries for a nutritious twist.
Vegetarian Version
- This recipe is already vegetarian-friendly, but ensure your whipped topping is free from gelatin.
- Use plant-based milk and whipped topping for a vegan option.
Gluten-Free Version
- Choose gluten-free chocolate sandwich cookies to make this dessert suitable for gluten-sensitive individuals.
- Check that your pudding mix is gluten-free, as some brands may contain gluten.
Spicy Version
- Add a pinch of cayenne pepper or chili powder to the pudding mix for a surprising kick.
- Top with spicy gummy worms or candies for an unexpected flavor combination.
Extra Indulgent Version
- Use double the amount of whipped topping for an ultra-creamy texture.
- Incorporate layers of chocolate fudge or caramel sauce between the pudding and cookie layers.
- Top with chocolate shavings or drizzle melted chocolate over the finished cups.
What to Serve With Halloween Dirt Cups — No-Bake Dirt Cups With Gummy Worms
Side Dishes
- Mini pumpkin muffins for a festive touch.
- Veggie platter with spooky-shaped cutouts.
- Cheese and cracker platter for a savory balance.
Sauces and Toppings
- Chocolate sauce drizzled over the cups for extra indulgence.
- Caramel sauce for a sweet contrast.
- Whipped cream dollops for added fluffiness.
Drinks
- Spooky punch with floating eyeball ice cubes.
- Apple cider served warm or chilled.
- Halloween-themed mocktails for a festive flair.
Desserts
- Ghost-shaped cookies for a fun treat.
- Chocolate-covered pretzels for a sweet and salty combo.
- Pumpkin pie bites for a seasonal favorite.
Storage Instructions
Refrigerator
- Store any leftover Halloween Dirt Cups in an airtight container in the refrigerator.
- They will stay fresh for up to 3 days, but they’re best enjoyed within the first day or two.
Freezer
- While it’s not recommended to freeze the assembled cups due to the whipped topping, you can freeze the pudding mixture and crushed cookies separately.
- Thaw in the refrigerator overnight before assembling the cups.
Reheating
- No reheating is necessary for this no-bake dessert; simply serve chilled.
- If you’ve frozen the pudding mixture, allow it to thaw completely before layering with cookies and serving.
Common Mistakes to Avoid
- Not crushing the cookies finely enough, which can lead to uneven layers and a less appealing texture.
- Skipping the chilling time, which is essential for the pudding to set properly and enhance the flavors.
- Using warm milk instead of cold, which can affect the consistency of the pudding.
- Overmixing the whipped topping, causing it to deflate and lose its light, fluffy texture.
FAQs about Halloween Dirt Cups — No-Bake Dirt Cups With Gummy Worms
Can I make this ahead of time?
Absolutely! These Halloween Dirt Cups can be made a day in advance. Just assemble them and store them in the refrigerator. This makes them a perfect option for busy moms who want to prepare for Halloween parties without the last-minute rush!
How long do these dirt cups last?
When stored in an airtight container in the refrigerator, your Halloween Dirt Cups will stay fresh for up to 3 days. However, they’re best enjoyed within the first couple of days for optimal flavor and texture.
Can I use different flavors of pudding?
Yes! While chocolate pudding is traditional, you can experiment with other flavors like vanilla or butterscotch. Just keep in mind that the overall look and taste will change, but it can be a fun twist for Halloween!
Are there any gluten-free options?
Definitely! To make gluten-free Halloween Dirt Cups, simply use gluten-free chocolate sandwich cookies and ensure your pudding mix is gluten-free. This way, everyone can enjoy this spooky treat!
What can I use instead of gummy worms?
If gummy worms aren’t your thing, feel free to get creative! You can use candy corn, chocolate bats, or even edible eyeballs for a fun and festive touch. The key is to keep it playful and in the spirit of Halloween!
Recipe Card
| Prep Time | 15 minutes |
|---|---|
| Cook Time | 0 minutes |
| Total Time | 30 minutes (including chilling time) |
| Servings | 4 servings |
| Calories | 250 per serving |
Ingredients
- 1 package (3.9 oz) chocolate instant pudding mix
- 2 cups milk
- 1 package (8 oz) whipped topping, thawed
- 1 package (15 oz) chocolate sandwich cookies, crushed
- Gummy worms for decoration
Instructions
- In a mixing bowl, whisk together the chocolate pudding mix and milk until smooth.
- Fold in the whipped topping until well combined.
- In clear cups or bowls, layer the crushed cookies and pudding mixture alternately.
- Top with additional crushed cookies to resemble dirt.
- Garnish with gummy worms on top.
- Refrigerate for at least 30 minutes before serving.
Notes
- For a more intense chocolate flavor, use dark chocolate pudding mix.
- Feel free to add other Halloween-themed candies for decoration.
- These can be made a day in advance and stored in the refrigerator.
Halloween Dirt Cups — No-Bake Dirt Cups With Gummy Worms
These Halloween Dirt Cups are not just a dessert; they’re a celebration of fun and creativity! With their playful layers and spooky gummy worms, they bring joy to any Halloween gathering. Whether you’re hosting a party or enjoying a cozy family night, these treats are sure to impress. I encourage you to try this easy recipe and share your thoughts! Did your kids love them? Did you add your own twist? I’d love to hear your experiences and any creative variations you come up with. Leave a review or comment below, and let’s celebrate the season together!
PrintHalloween Dirt Cups: Delight in No-Bake Treats with Worms!
Halloween Dirt Cups are a fun and easy no-bake dessert that features layers of chocolate pudding, crushed cookies, and gummy worms, perfect for Halloween celebrations.
- Prep Time: 15 minutes
- Cook Time: 0 minutes
- Total Time: 30 minutes (including chilling time)
- Yield: 4 servings 1x
- Category: Dessert
- Method: No-Bake
- Cuisine: American
- Diet: Vegetarian
Ingredients
- 1 package (3.9 oz) chocolate instant pudding mix
- 2 cups milk
- 1 package (8 oz) whipped topping, thawed
- 1 package (15 oz) chocolate sandwich cookies, crushed
- Gummy worms for decoration
Instructions
- In a mixing bowl, whisk together the chocolate pudding mix and milk until smooth.
- Fold in the whipped topping until well combined.
- In clear cups or bowls, layer the crushed cookies and pudding mixture alternately.
- Top with additional crushed cookies to resemble dirt.
- Garnish with gummy worms on top.
- Refrigerate for at least 30 minutes before serving.
Notes
- For a more intense chocolate flavor, use dark chocolate pudding mix.
- Feel free to add other Halloween-themed candies for decoration.
- These can be made a day in advance and stored in the refrigerator.
Nutrition
- Serving Size: 1 cup
- Calories: 250
- Sugar: 20g
- Sodium: 150mg
- Fat: 10g
- Saturated Fat: 5g
- Unsaturated Fat: 3g
- Trans Fat: 0g
- Carbohydrates: 35g
- Fiber: 1g
- Protein: 3g
- Cholesterol: 15mg
About the Author

Marianne
kitchen guide and fellow food
Hi, we’re Marianne Hi there, and welcome to Recipes Days! I’m Marianne, your kitchen guide and fellow food lover. If you’ve ever felt overwhelmed by complicated recipes or thought, “I don’t have time to cook something good,” I’ve been there too. That’s why Recipes Days exists—to make cooking feel effortless, fun, and full of flavor, no matter your experience level.


