
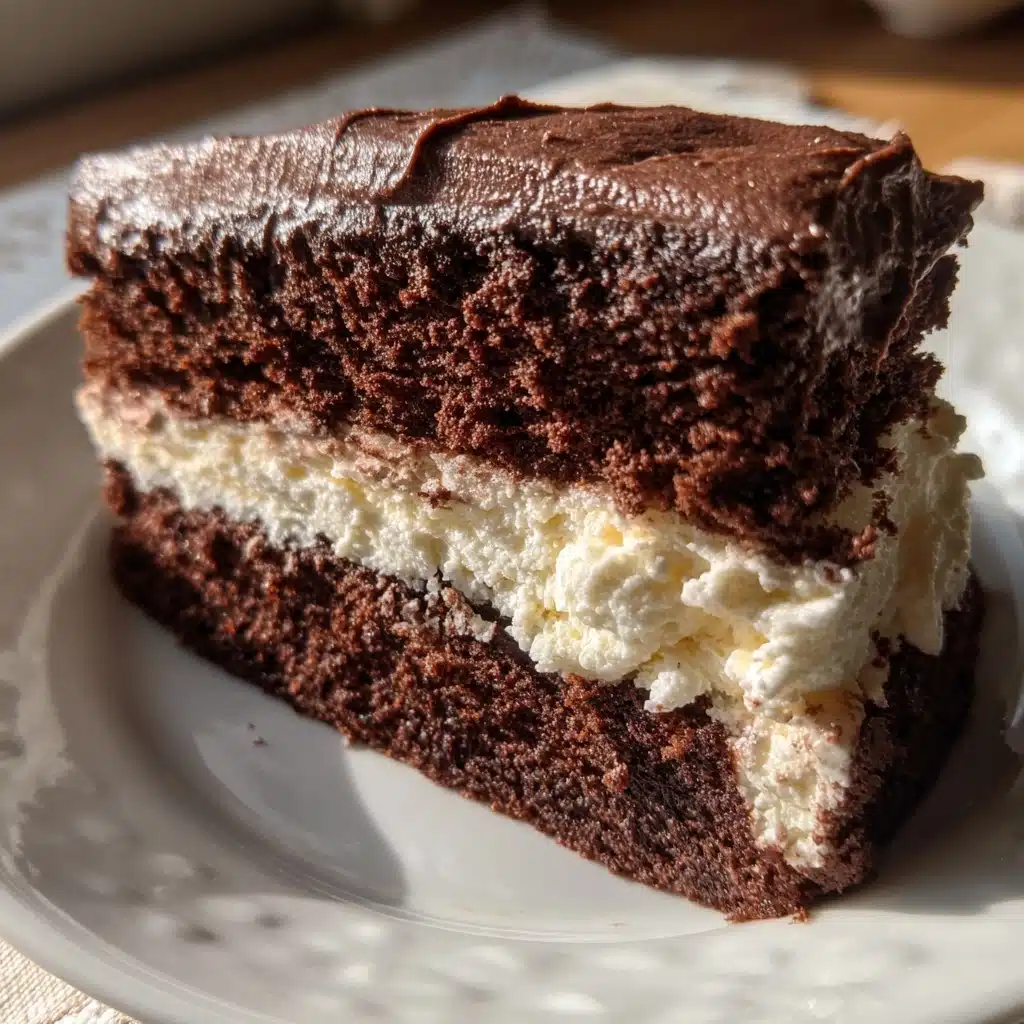
Chocolate Victoria Sponge: A Classic Cake with a Rich Twist
There’s something magical about a Chocolate Victoria Sponge. It’s a delightful twist on the classic cake that brings a rich, indulgent flavor to any occasion. Whether you’re celebrating a birthday, hosting a tea party, or just need a sweet treat after a long day, this cake is your go-to solution. I know how busy life can get, especially for us moms and professionals. This recipe is not only quick to whip up but also impresses your loved ones with its moist texture and chocolatey goodness. Trust me, they won’t be able to resist!
Why You’ll Love This Chocolate Victoria Sponge
This Chocolate Victoria Sponge is a dream come true for busy cooks like us. It’s incredibly easy to make, requiring just a handful of ingredients and minimal prep time. The rich chocolate flavor elevates the classic sponge, making it a crowd-pleaser at any gathering. Plus, it’s versatile enough to suit any occasion, from casual family dinners to elegant celebrations. You’ll love how quickly it disappears from the table!
Ingredients for Chocolate Victoria Sponge
Gathering the right ingredients is the first step to creating your Chocolate Victoria Sponge. Here’s what you’ll need:
- Unsalted butter: This adds richness and moisture. Make sure it’s softened for easy mixing.
- Caster sugar: Finer than regular sugar, it helps create a light and fluffy texture.
- Large eggs: They provide structure and moisture. Room temperature eggs mix better.
- Self-raising flour: This flour contains baking powder, giving your cake that lovely rise.
- Cocoa powder: The star of the show! It gives the cake its rich chocolate flavor. Opt for high-quality for the best taste.
- Baking powder: A little extra lift to ensure your cake is light and airy.
- Milk: This helps achieve a smooth batter and adds moisture to the cake.
For the filling, you’ll need:
- Double cream: Whipped to perfection, it adds a luscious layer between the cake.
- Chocolate ganache or chocolate spread: This adds an extra layer of chocolatey goodness. Choose your favorite for a personal touch.
All ingredient quantities are listed at the bottom of the article for easy printing. Feel free to experiment with different brands or types of cocoa powder to find your perfect flavor!
How to Make Chocolate Victoria Sponge
Step 1: Preheat and Prepare
Preheating your oven is crucial for baking success. It ensures that your Chocolate Victoria Sponge rises beautifully from the moment it goes in. Set your oven to 180°C (350°F) and let it warm up while you prepare your cake tins. Greasing the tins is equally important; it prevents the cake from sticking. I like to use a bit of butter or baking spray for a smooth release. Trust me, there’s nothing worse than a cake that won’t come out of the tin!
Step 2: Cream Butter and Sugar
Creaming the butter and sugar together is where the magic begins. This process incorporates air into the mixture, giving your cake that light, fluffy texture we all love. Use a hand mixer or stand mixer to beat the softened butter and caster sugar until it’s pale and creamy. It should look almost like a cloud! This step is essential for a successful Chocolate Victoria Sponge, so don’t rush it. Take your time, and enjoy the transformation!
Step 3: Add Eggs
When it comes to adding eggs, patience is key. Add them one at a time, mixing well after each addition. This allows the eggs to fully incorporate into the batter, creating a smooth consistency. If you dump them all in at once, you risk a lumpy batter. Plus, each egg adds moisture and richness, enhancing the overall flavor of your Chocolate Victoria Sponge. It’s a simple step, but it makes a world of difference!
Step 4: Combine Dry Ingredients
Now it’s time to sift and fold in the dry ingredients. Sifting the self-raising flour, cocoa powder, and baking powder helps eliminate lumps and aerates the mixture. Gently fold the dry ingredients into the wet mixture using a spatula. This technique preserves the air you’ve worked so hard to incorporate. Overmixing can lead to a dense cake, and we want our Chocolate Victoria Sponge to be light and airy!
Step 5: Add Milk
Adding milk to your batter is the final touch that brings everything together. It helps achieve a smooth, pourable consistency, making it easier to divide between the cake tins. The milk also adds moisture, ensuring your Chocolate Victoria Sponge stays soft and delicious. Don’t skip this step! It’s the secret to that melt-in-your-mouth texture that will have everyone coming back for seconds.
Step 6: Bake the Cakes
Once your batter is ready, it’s time to bake! Divide the mixture evenly between the prepared cake tins and pop them in the oven. Bake for 25-30 minutes, but keep an eye on them. Every oven is different! To check for doneness, insert a skewer into the center of the cakes. If it comes out clean, they’re ready. The aroma of chocolate wafting through your kitchen will be irresistible!
Step 7: Cool the Cakes
Cooling your cakes properly is essential before frosting. After baking, let them sit in the tins for about 10 minutes. This allows them to firm up slightly, making them easier to handle. Then, transfer them to a wire rack to cool completely. If you frost them while they’re still warm, the icing will melt and slide off. Patience is a virtue, especially when it comes to cake!
Step 8: Assemble the Cake
Now for the fun part—assembling your Chocolate Victoria Sponge! Start by placing one cake layer on a serving plate. Spread a generous layer of chocolate ganache or chocolate spread on top, followed by a thick layer of whipped cream. Place the second cake layer on top, and if you like, dust it with icing sugar for a beautiful finish. This is where you can get creative! Your cake is now ready to impress!
Tips for Success
- Always use room temperature ingredients for better mixing.
- Don’t skip the sifting step; it helps create a lighter cake.
- Keep an eye on your cakes while baking; ovens can vary.
- Let the cakes cool completely before frosting to avoid melting.
- For a richer flavor, opt for high-quality cocoa powder.
Equipment Needed
- Mixing bowls: A large bowl for mixing and a smaller one for whipping cream.
- Electric mixer: A hand mixer works well, but a stand mixer is a great alternative.
- 8-inch round cake tins: You can use square tins if that’s what you have.
- Spatula: A rubber spatula is perfect for folding in ingredients.
- Wire rack: Essential for cooling; a plate can work in a pinch.
Variations
- Gluten-Free: Substitute self-raising flour with a gluten-free blend for a delicious gluten-free Chocolate Victoria Sponge.
- Vegan: Replace eggs with flaxseed meal mixed with water and use plant-based butter and milk for a vegan-friendly version.
- Mint Chocolate: Add a few drops of peppermint extract to the batter for a refreshing minty twist.
- Chocolate Orange: Incorporate orange zest into the batter for a delightful chocolate-orange flavor combination.
- Nutty Delight: Fold in chopped nuts like walnuts or hazelnuts for added texture and flavor.
Serving Suggestions
- Pair your Chocolate Victoria Sponge with a dollop of fresh whipped cream for extra indulgence.
- Serve alongside a scoop of vanilla ice cream for a delightful contrast.
- A cup of freshly brewed coffee or tea complements the rich flavors beautifully.
- For a festive touch, garnish with fresh berries or edible flowers.
FAQs about Chocolate Victoria Sponge
Can I make this Chocolate Victoria Sponge ahead of time?
Absolutely! You can bake the cakes a day in advance. Just store them in an airtight container at room temperature. Frost them right before serving for the best taste and texture.
What can I use instead of double cream?
If you don’t have double cream, heavy whipping cream works just as well. Just whip it until soft peaks form, and you’ll have a delicious filling for your Chocolate Victoria Sponge.
How do I store leftover cake?
Store any leftover Chocolate Victoria Sponge in an airtight container at room temperature for up to three days. If you want to keep it longer, refrigerate it, but be aware that it may dry out a bit.
Can I freeze the Chocolate Victoria Sponge?
Yes! You can freeze the un-frosted cake layers. Wrap them tightly in plastic wrap and then in aluminum foil. They’ll stay fresh for up to three months. Just thaw them in the fridge before frosting.
What’s the best way to serve this cake?
For a delightful presentation, serve your Chocolate Victoria Sponge with a dusting of icing sugar and fresh berries. A side of whipped cream or a scoop of ice cream makes it even more indulgent!
Summarizing the Joy of Chocolate Victoria Sponge
There’s a special kind of joy that comes from baking a Chocolate Victoria Sponge. It’s not just about the rich, moist cake; it’s about the smiles it brings to your loved ones’ faces. Each slice is a celebration of flavors, a moment of indulgence in our busy lives. Whether it’s a birthday, a cozy family gathering, or simply a treat for yourself, this cake is a reminder that life is sweeter when shared. So, roll up your sleeves, embrace the process, and let the aroma of chocolate fill your kitchen. You’re not just baking; you’re creating memories!
PrintChocolate Victoria Sponge: Discover This Delicious Twist!
A delightful twist on the classic Victoria sponge, this Chocolate Victoria Sponge is rich, moist, and perfect for any occasion.
- Prep Time: 20 minutes
- Cook Time: 30 minutes
- Total Time: 50 minutes
- Yield: 8 servings 1x
- Category: Dessert
- Method: Baking
- Cuisine: British
- Diet: Vegetarian
Ingredients
- 200g unsalted butter, softened
- 200g caster sugar
- 4 large eggs
- 200g self-raising flour
- 50g cocoa powder
- 1 tsp baking powder
- 2 tbsp milk
- For the filling: 200ml double cream, whipped
- 100g chocolate ganache or chocolate spread
Instructions
- Preheat the oven to 180°C (350°F) and grease two 8-inch round cake tins.
- In a mixing bowl, cream together the softened butter and caster sugar until light and fluffy.
- Add the eggs one at a time, mixing well after each addition.
- Sift in the self-raising flour, cocoa powder, and baking powder, then fold gently until combined.
- Add the milk and mix until the batter is smooth.
- Divide the batter evenly between the prepared cake tins.
- Bake in the preheated oven for 25-30 minutes or until a skewer inserted into the center comes out clean.
- Allow the cakes to cool in the tins for 10 minutes before transferring to a wire rack to cool completely.
- Once cooled, spread chocolate ganache or chocolate spread on top of one cake layer, then add the whipped cream.
- Place the second cake layer on top and dust with icing sugar if desired.
Notes
- Ensure all ingredients are at room temperature for best results.
- For a richer flavor, use high-quality cocoa powder.
- This cake can be stored in an airtight container for up to 3 days.
Nutrition
- Serving Size: 1 slice
- Calories: 350
- Sugar: 25g
- Sodium: 150mg
- Fat: 20g
- Saturated Fat: 10g
- Unsaturated Fat: 5g
- Trans Fat: 0g
- Carbohydrates: 40g
- Fiber: 2g
- Protein: 5g
- Cholesterol: 80mg
About the Author

Marianne
kitchen guide and fellow food
Hi, we’re Marianne Hi there, and welcome to Recipes Days! I’m Marianne, your kitchen guide and fellow food lover. If you’ve ever felt overwhelmed by complicated recipes or thought, “I don’t have time to cook something good,” I’ve been there too. That’s why Recipes Days exists—to make cooking feel effortless, fun, and full of flavor, no matter your experience level.


