
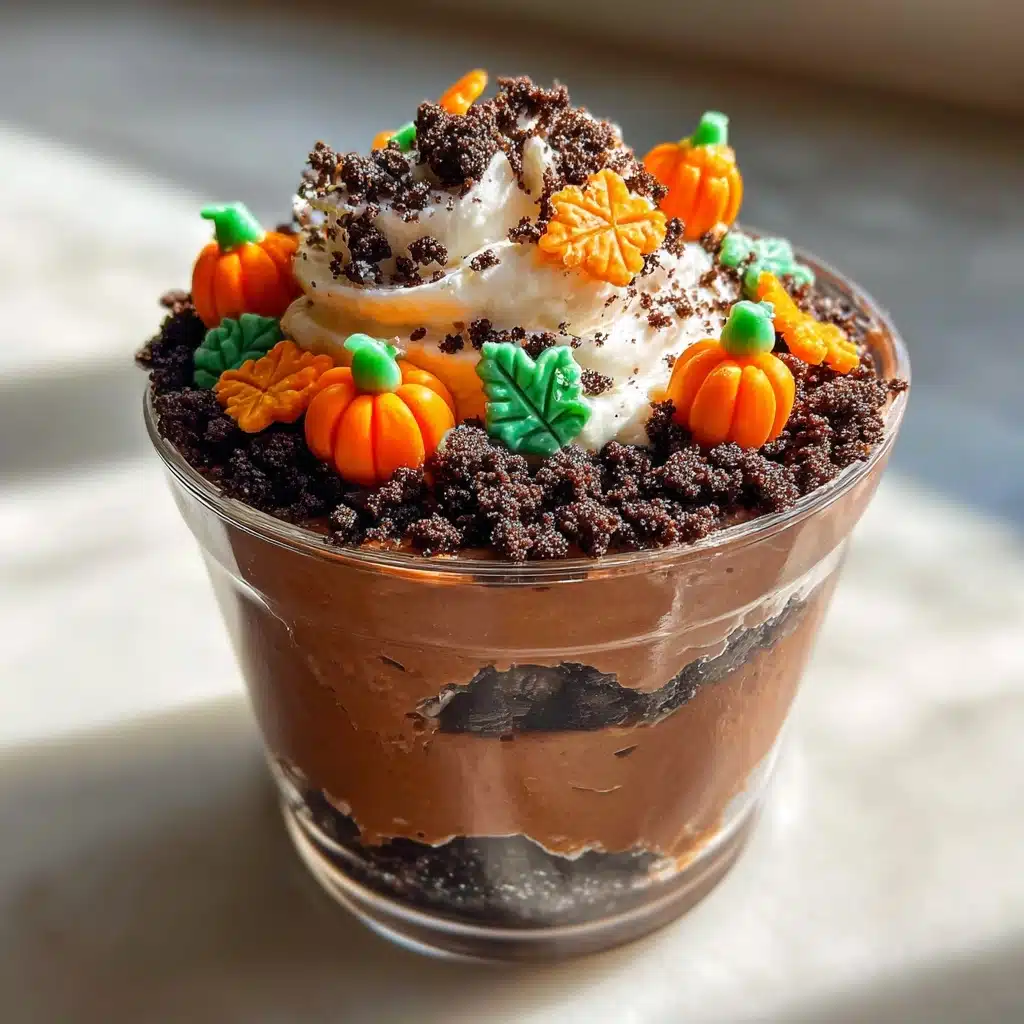
Irresistible Pumpkin Patch Dirt Cups for Festive Fun
As the leaves turn and the air gets crisp, I find myself craving cozy, festive treats. That’s where these Irresistible Pumpkin Patch Dirt Cups for Festive Fun come in! They’re not just a dessert; they’re a delightful experience that brings smiles to faces of all ages. Perfect for busy moms like me, this no-bake recipe is quick and easy, making it a fantastic solution for last-minute gatherings. Plus, who can resist the charm of a dessert that looks like a pumpkin patch? Let’s dive into this fun culinary adventure together!
Why You’ll Love This Irresistible Pumpkin Patch Dirt Cups for Festive Fun
These Irresistible Pumpkin Patch Dirt Cups for Festive Fun are a dream come true for busy schedules. They come together in just 15 minutes, leaving you with more time to enjoy the festivities. The rich chocolate pudding paired with crunchy Oreos creates a delightful contrast that everyone will love. Plus, they’re a hit with kids and adults alike, making them the perfect treat for any gathering!
Ingredients for Irresistible Pumpkin Patch Dirt Cups for Festive Fun
Gathering the right ingredients is half the fun! Here’s what you’ll need to create these delightful Irresistible Pumpkin Patch Dirt Cups for Festive Fun:
- Chocolate pudding mix: This is the star of the show, providing a rich and creamy base that everyone loves.
- Milk: Essential for mixing with the pudding to achieve that smooth, luscious texture.
- Oreo cookies: Crushed to create the “dirt” layer, they add a delightful crunch and chocolatey flavor.
- Whipped topping: This lightens the pudding mixture, giving it a fluffy texture that’s irresistible.
- Gummy worms: These fun candies add a playful touch, making your dessert look like a real pumpkin patch!
- Mini pumpkins: Whether candy or chocolate, these cute decorations bring the festive spirit to life.
For those looking for a healthier twist, consider using sugar-free pudding mix. You can also make these cups a day in advance, which is a lifesaver for busy schedules. Feel free to get creative with other Halloween-themed candies for decoration!
Exact quantities for each ingredient can be found at the bottom of the article, ready for printing. Happy cooking!
How to Make Irresistible Pumpkin Patch Dirt Cups for Festive Fun
Step 1: Prepare the Pudding Mixture
Let’s kick things off by whisking together the chocolate pudding mix and milk in a bowl. I like to use a whisk for this, as it helps create a smooth, lump-free mixture. Keep whisking until it thickens up nicely, which usually takes about two minutes. The rich chocolate aroma will fill your kitchen, making it hard to resist sneaking a taste! This creamy base is what makes these Irresistible Pumpkin Patch Dirt Cups for Festive Fun so delightful.
Step 2: Fold in the Whipped Topping
Next, it’s time to fold in the whipped topping. Gently add it to the pudding mixture, using a spatula to combine them. Be careful not to overmix; you want to keep that light, airy texture. This step is crucial for achieving the fluffy consistency that makes these cups so irresistible. The combination of chocolate and whipped topping creates a heavenly blend that will have everyone coming back for seconds!
Step 3: Layer the Ingredients
Now, grab your serving cups and start layering! Begin with a generous spoonful of the chocolate pudding mixture at the bottom. Then, sprinkle a layer of crushed Oreo cookies on top. Repeat this process until your cups are filled, leaving some space at the top for the fun decorations. The layers not only look beautiful but also create a delightful mix of flavors and textures in every bite of these Pumpkin Patch Dirt Cups.
Step 4: Create the Dirt Effect
To create that authentic “dirt” effect, top your layered cups with more crushed Oreos. This gives the appearance of rich, dark soil, perfect for our pumpkin patch theme. Don’t be shy with the Oreos; a thick layer adds to the fun! The contrast between the creamy pudding and the crunchy cookies is what makes these cups so special. Trust me, your guests will be impressed by this clever touch!
Step 5: Add Fun Decorations
Now comes the best part—decorating! Grab your gummy worms and mini pumpkins, and let your creativity shine. Place a few gummy worms on top, letting them peek out from the “dirt.” Then, add the mini pumpkins for that festive flair. This is where the magic happens, transforming your dessert into a playful pumpkin patch. Kids and adults alike will love the whimsical look of these Halloween dessert cups!
Step 6: Chill Before Serving
Finally, it’s time to chill your creations. Pop the cups in the refrigerator for at least 30 minutes. This step is essential, as it allows the flavors to meld together and the pudding to set properly. Plus, serving them cold makes for a refreshing treat! When you’re ready to serve, just pull them out and watch the smiles light up the room. These Irresistible Pumpkin Patch Dirt Cups for Festive Fun are sure to be a hit!
Tips for Success
- Use a whisk for a smooth pudding mixture; it makes all the difference!
- Don’t overmix when folding in the whipped topping; keep it light and fluffy.
- Chill the cups longer if you can; the flavors deepen with time.
- Get creative with decorations; use seasonal candies for a personal touch.
- Make a double batch for larger gatherings; they’ll disappear quickly!
Equipment Needed
- Mixing bowl: A large bowl works best, but any bowl will do.
- Whisk: A whisk is ideal for mixing, but a fork can work in a pinch.
- Spatula: Use a spatula for folding in the whipped topping.
- Serving cups: Any small cups or jars will make a charming presentation.
Variations
- Chocolate Pudding Swap: Try using vanilla pudding for a different flavor profile. It pairs wonderfully with the Oreos!
- Healthier Option: Use sugar-free pudding mix and light whipped topping to cut down on calories.
- Gluten-Free Version: Substitute regular Oreos with gluten-free cookies to accommodate dietary needs.
- Fruit Additions: Add fresh fruit like sliced strawberries or bananas for a fruity twist.
- Nutty Crunch: Incorporate crushed nuts or granola for an extra layer of texture and flavor.
Serving Suggestions
- Pair these Irresistible Pumpkin Patch Dirt Cups for Festive Fun with warm apple cider for a cozy fall vibe.
- Serve alongside a platter of seasonal fruits for a refreshing contrast.
- Consider using clear cups to showcase the beautiful layers.
- Add festive napkins and plates to enhance the presentation.
FAQs about Irresistible Pumpkin Patch Dirt Cups for Festive Fun
Can I make these Pumpkin Patch Dirt Cups in advance?
Absolutely! These Pumpkin Patch Dirt Cups can be made a day ahead. Just keep them covered in the fridge until you’re ready to serve. This makes them a perfect option for busy days!
What can I use instead of Oreos?
If Oreos aren’t your thing, feel free to use any chocolate cookies you love. You could even try graham crackers for a different texture. The key is to create that “dirt” effect!
How can I make these cups healthier?
For a healthier twist, opt for sugar-free pudding mix and light whipped topping. You can also add fresh fruit for a nutritious boost while keeping the fun factor intact!
Can I use different decorations?
Definitely! Get creative with your decorations. Use gummy spiders, candy corn, or even chocolate-covered pretzels to add a unique touch to your Halloween dessert cups.
How long do these cups last in the fridge?
These delightful cups can last up to three days in the fridge. Just make sure they’re covered to keep them fresh and tasty!
Summarizing the Joy of Irresistible Pumpkin Patch Dirt Cups for Festive Fun
Creating these Irresistible Pumpkin Patch Dirt Cups for Festive Fun is more than just making a dessert; it’s about crafting memories. The joy on your loved ones’ faces as they dig into these whimsical treats is priceless. Each layer tells a story, from the creamy chocolate pudding to the crunchy Oreos. Plus, the playful decorations spark laughter and delight. Whether it’s a family gathering or a Halloween party, these cups bring everyone together. So, roll up your sleeves, embrace the festive spirit, and let these delightful cups be the highlight of your celebrations!
Irresistible Pumpkin Patch Dirt Cups for Festive Fun Await!

Delicious and fun dessert cups that resemble a pumpkin patch, perfect for festive gatherings.
- Prep Time: 15 minutes
- Cook Time: 0 minutes
- Total Time: 30 minutes
- Yield: 4 servings 1x
- Category: Dessert
- Method: No-bake
- Cuisine: American
- Diet: Vegetarian
Ingredients
- 1 package of chocolate pudding mix
- 2 cups of milk
- 1 package of Oreo cookies, crushed
- 1 cup of whipped topping
- Gummy worms
- Mini pumpkins (candy or chocolate)
Instructions
- In a bowl, whisk together the chocolate pudding mix and milk until smooth.
- Fold in the whipped topping until well combined.
- In serving cups, layer the chocolate pudding mixture and crushed Oreo cookies.
- Top with more crushed Oreos to resemble dirt.
- Decorate with gummy worms and mini pumpkins on top.
- Chill in the refrigerator for at least 30 minutes before serving.
Notes
- For a healthier option, consider using sugar-free pudding mix.
- These can be made a day in advance for convenience.
- Feel free to add other Halloween-themed candies for decoration.
Nutrition
- Serving Size: 1 cup
- Calories: 250
- Sugar: 18g
- Sodium: 200mg
- Fat: 12g
- Saturated Fat: 6g
- Unsaturated Fat: 4g
- Trans Fat: 0g
- Carbohydrates: 32g
- Fiber: 2g
- Protein: 3g
- Cholesterol: 15mg
About the Author

Marianne
kitchen guide and fellow food
Hi, we’re Marianne Hi there, and welcome to Recipes Days! I’m Marianne, your kitchen guide and fellow food lover. If you’ve ever felt overwhelmed by complicated recipes or thought, “I don’t have time to cook something good,” I’ve been there too. That’s why Recipes Days exists—to make cooking feel effortless, fun, and full of flavor, no matter your experience level.


