
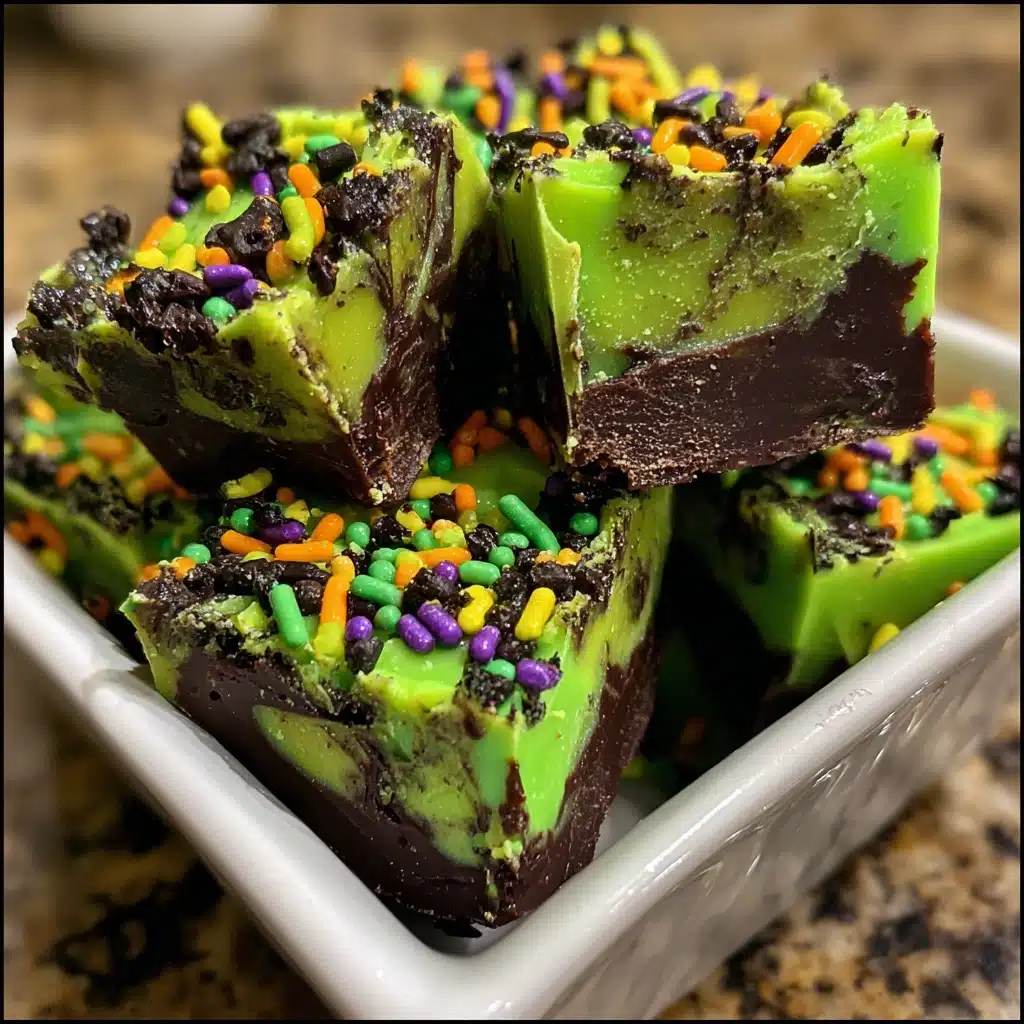
Halloween Wicked Witch Fudge
As the leaves turn and the air gets crisp, I find myself craving something sweet and a little spooky. That’s where my Halloween Wicked Witch Fudge comes in! This delightful treat is not only a quick solution for busy days, but it also brings a splash of festive fun to any gathering. With its vibrant green hue and rich chocolate flavor, it’s sure to impress your loved ones. Plus, it’s so easy to whip up that even the busiest of moms can find time to create this wickedly delicious dessert!
Why You’ll Love This Halloween Wicked Witch Fudge
This Halloween Wicked Witch Fudge is a dream come true for busy moms and professionals alike. It’s incredibly easy to make, taking just 15 minutes of prep time. The rich chocolate flavor combined with that eye-catching green color makes it a hit at any Halloween gathering. Plus, it’s a delightful way to involve your kids in the kitchen, creating sweet memories while whipping up this spooktacular treat!
Ingredients for Halloween Wicked Witch Fudge
Gathering the right ingredients is half the fun of making my Halloween Wicked Witch Fudge! Here’s what you’ll need:
- Semi-sweet chocolate chips: These are the star of the show, providing that rich, chocolatey goodness we all crave.
- Sweetened condensed milk: This creamy ingredient adds sweetness and helps bind everything together, creating a smooth texture.
- Unsweetened cocoa powder: For an extra chocolate kick, cocoa powder deepens the flavor and gives the fudge a rich color.
- Butter: A little butter goes a long way in making the fudge silky and indulgent.
- Vanilla extract: This aromatic addition enhances the overall flavor, making each bite even more delightful.
- Green food coloring: The magic ingredient that transforms your fudge into a wickedly vibrant treat! Adjust the amount to achieve your desired shade.
- Chopped nuts (optional): If you like a bit of crunch, feel free to fold in some nuts. They add texture and a nutty flavor.
For exact measurements, check the bottom of the article where you can find everything listed for easy printing. Happy cooking!
How to Make Halloween Wicked Witch Fudge
Now that we have our ingredients ready, let’s dive into the fun part—making the Halloween Wicked Witch Fudge! This process is simple and quick, perfect for those busy days when you want to whip up something special. Follow these steps, and you’ll have a spooktacular treat in no time!
Step 1: Melt the Butter and Chocolate
Start by placing your butter and semi-sweet chocolate chips in a saucepan over low heat. Stir gently as they melt together. The key here is to keep the heat low to avoid burning the chocolate. You want a smooth, glossy mixture that looks like liquid magic!
Step 2: Combine Sweetened Condensed Milk and Cocoa Powder
Once your chocolate and butter are melted, it’s time to add the sweetened condensed milk and cocoa powder. Stir them in until everything is well combined. This step is crucial for achieving that rich, fudgy texture we all love. It should look thick and creamy, like a chocolate dream!
Step 3: Add Vanilla Extract
Next, pour in the vanilla extract. This little addition elevates the flavor, making your fudge even more irresistible. Mix thoroughly until the vanilla is fully incorporated. You’ll start to smell that delightful aroma wafting through your kitchen!
Step 4: Incorporate Green Food Coloring
Now comes the fun part—adding the green food coloring! Start with a few drops and mix it in. Keep adding until you reach your desired shade of wicked green. This is where your fudge transforms into a Halloween masterpiece, so don’t be shy with the color!
Step 5: Fold in Chopped Nuts
If you’re using chopped nuts, now’s the time to fold them in gently. They add a lovely crunch and a nutty flavor that complements the chocolate beautifully. If you’re not a fan of nuts, feel free to skip this step. Your fudge will still be delicious!
Step 6: Pour and Spread Mixture
Grab your greased 8×8 inch pan and pour the fudge mixture into it. Use a spatula to spread it evenly across the pan. Make sure it’s nice and smooth on top. This is where the magic happens, so take a moment to admire your creation!
Step 7: Refrigerate
Now, it’s time to let the fudge chill. Place the pan in the refrigerator for at least 2 hours, or until it’s firm. This step is essential for achieving that perfect fudge texture. Patience is key, but I promise it will be worth the wait!
Step 8: Cut and Serve
Once your fudge is set, take it out of the fridge and cut it into squares. Serve these wickedly delightful treats to your family and friends. Watch their faces light up as they enjoy this spooky, sweet indulgence!
Tips for Success
- Use high-quality chocolate chips for the best flavor.
- Don’t rush the melting process; low heat is your friend!
- For a smoother texture, make sure to stir continuously.
- Experiment with the amount of food coloring to create your perfect shade.
- Let the fudge chill completely for the best cutting results.
Equipment Needed
- Medium saucepan: A non-stick pan works wonders for easy melting.
- Spatula: Use a silicone spatula for smooth mixing and scraping.
- 8×8 inch pan: Any square or rectangular dish will do if you don’t have this size.
- Measuring cups: Essential for accurate ingredient portions.
Variations
- Nut-Free Option: Omit the chopped nuts for a nut-free treat that everyone can enjoy.
- Vegan Version: Substitute the butter with coconut oil and use dairy-free chocolate chips for a vegan-friendly fudge.
- Flavor Twists: Add a pinch of sea salt or a dash of peppermint extract for a unique flavor profile.
- Colorful Fudge: Mix in different food colorings to create a rainbow effect for a fun twist on the classic green.
- Spooky Add-Ins: Fold in Halloween-themed candies like gummy worms or candy corn for an extra festive touch!
Serving Suggestions
- Pair your Halloween Wicked Witch Fudge with a warm cup of spiced apple cider for a cozy treat.
- Serve alongside ghost-shaped cookies for a fun dessert platter that will delight kids and adults alike.
- For a festive touch, garnish each square with Halloween-themed sprinkles or edible glitter.
- Present the fudge on a spooky-themed platter to enhance the Halloween spirit!
FAQs about Halloween Wicked Witch Fudge
Can I make Halloween Wicked Witch Fudge ahead of time?
Absolutely! This fudge can be made a few days in advance. Just store it in an airtight container in the refrigerator. It will stay fresh and delicious, ready to impress your guests!
What can I use instead of green food coloring?
If you prefer a natural option, you can use matcha powder for a green hue. It adds a subtle flavor while keeping your fudge vibrant. Just remember, the color may not be as bright!
How do I store leftovers?
Store any leftover Halloween Wicked Witch Fudge in an airtight container in the refrigerator. It should last for about a week, but I doubt it will last that long with how delicious it is!
Can I freeze the fudge?
Yes, you can freeze the fudge! Just cut it into squares, wrap each piece in plastic wrap, and place them in a freezer-safe container. Thaw in the fridge before serving for the best texture.
What can I add to make it more festive?
For a fun twist, consider adding Halloween-themed sprinkles or even mini candy corn on top before refrigerating. It adds a delightful crunch and a pop of color to your spooky treat!
Summarizing the Joy of Halloween Wicked Witch Fudge
Making Halloween Wicked Witch Fudge is more than just whipping up a dessert; it’s about creating memories. The vibrant green color and rich chocolate flavor bring a sense of joy and excitement to any Halloween celebration. Whether you’re sharing it with family or surprising friends, this treat is sure to spark smiles and laughter. Plus, it’s a fantastic way to involve your kids in the kitchen, fostering creativity and fun. So, gather your ingredients, embrace the spirit of Halloween, and enjoy the delightful experience of making and sharing this wickedly delicious fudge!
PrintHalloween Wicked Witch Fudge: A Spooktacular Treat!

A deliciously spooky fudge perfect for Halloween celebrations, featuring a vibrant green color and a rich chocolate flavor.
- Prep Time: 15 minutes
- Cook Time: 10 minutes
- Total Time: 2 hours 25 minutes
- Yield: 16 servings 1x
- Category: Dessert
- Method: Stovetop
- Cuisine: American
- Diet: Vegetarian
Ingredients
- 2 cups semi-sweet chocolate chips
- 1 can (14 oz) sweetened condensed milk
- 1/2 cup unsweetened cocoa powder
- 1/2 cup butter
- 1 teaspoon vanilla extract
- Green food coloring
- 1/2 cup chopped nuts (optional)
Instructions
- In a saucepan, melt the butter and chocolate chips over low heat, stirring until smooth.
- Stir in the sweetened condensed milk and cocoa powder until well combined.
- Add the vanilla extract and mix thoroughly.
- Incorporate green food coloring until the desired color is achieved.
- If using, fold in the chopped nuts.
- Pour the mixture into a greased 8×8 inch pan and spread evenly.
- Refrigerate for at least 2 hours or until firm.
- Cut into squares and serve for a wickedly delightful treat!
Notes
- For a more intense green color, add more food coloring as needed.
- Store leftovers in an airtight container in the refrigerator.
- This fudge can be decorated with Halloween-themed sprinkles for an extra festive touch.
Nutrition
- Serving Size: 1 square
- Calories: 150
- Sugar: 20g
- Sodium: 50mg
- Fat: 7g
- Saturated Fat: 4g
- Unsaturated Fat: 2g
- Trans Fat: 0g
- Carbohydrates: 20g
- Fiber: 1g
- Protein: 2g
- Cholesterol: 10mg
About the Author

Marianne
kitchen guide and fellow food
Hi, we’re Marianne Hi there, and welcome to Recipes Days! I’m Marianne, your kitchen guide and fellow food lover. If you’ve ever felt overwhelmed by complicated recipes or thought, “I don’t have time to cook something good,” I’ve been there too. That’s why Recipes Days exists—to make cooking feel effortless, fun, and full of flavor, no matter your experience level.


