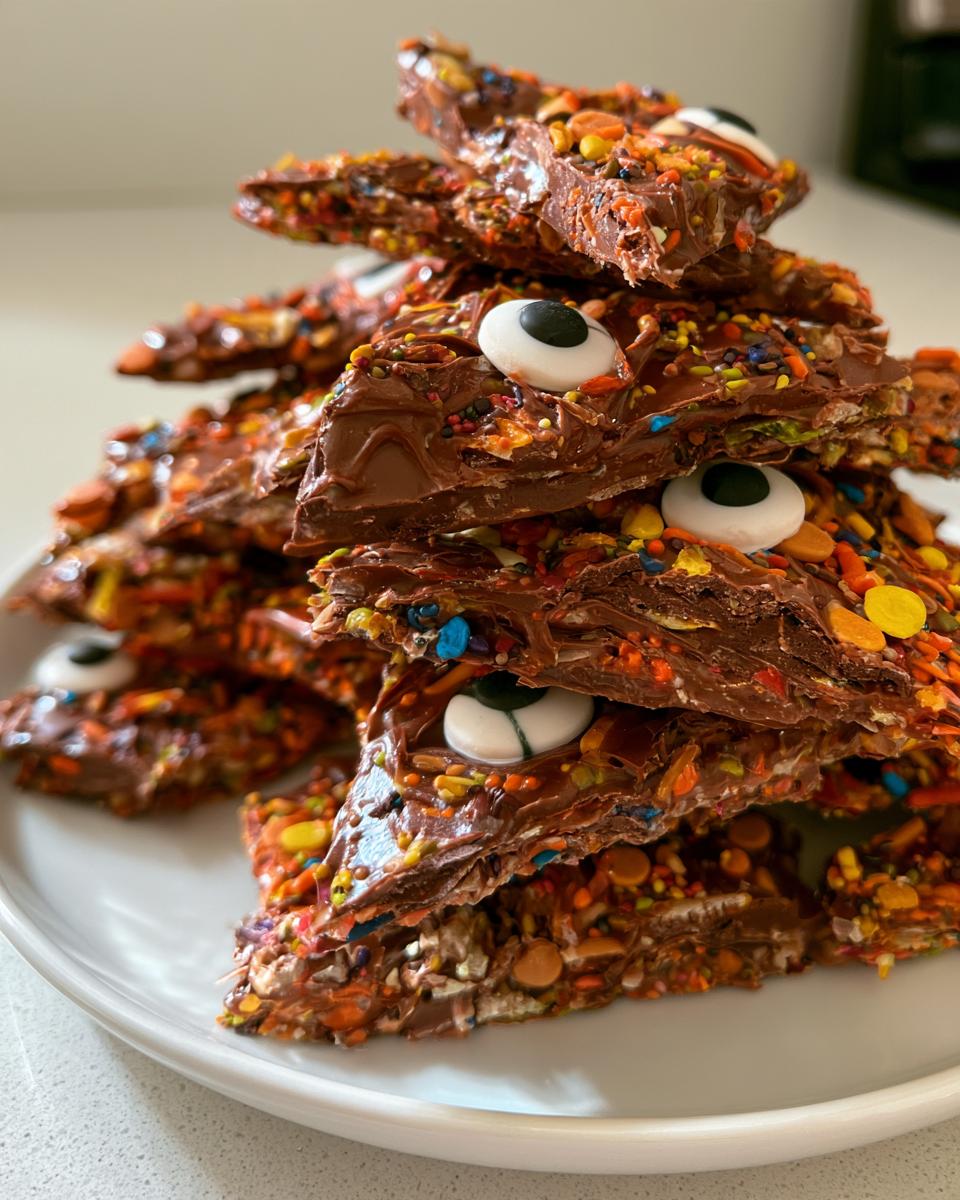
Halloween Bark with Candy Eyes: The Easiest Treat Ever!
As the leaves turn and the air gets crisp, it’s time to whip up some festive treats! This Halloween Bark with Candy Eyes is not only a quick solution for busy days, but it also brings a smile to everyone’s face. With its delightful combination of dark and white chocolate, topped with colorful candy eyes, this treat is as fun to make as it is to eat. Perfect for Halloween parties, school events, or cozy family nights, it’s a no-bake dessert that’s easy to prepare, making it a hit for both kids and adults alike!
Why You’ll Love This Halloween Bark with Candy Eyes
This Halloween Bark with Candy Eyes is a delightful treat that checks all the boxes for busy moms and professionals. It’s incredibly easy to make, requiring just a few simple steps. The rich chocolate flavor combined with the playful candy eyes makes it a hit with kids and adults alike. Plus, it’s perfect for gatherings or as a fun family activity. Best of all, you can make it ahead of time, allowing you to enjoy the festivities without the last-minute rush!
Easy to Make
With just a few ingredients and no baking required, this treat is perfect for even the busiest of schedules.
Delicious Flavor
The combination of dark and white chocolate creates a rich, creamy flavor that’s hard to resist.
Family-Friendly
Kids love the colorful candy eyes, making it a fun treat for Halloween parties or family movie nights.
Make-Ahead Friendly
Prepare this bark in advance, so you can focus on enjoying the holiday with your loved ones!
Ingredients for Halloween Bark with Candy Eyes
Main Ingredients
- Dark chocolate chips: The base of our bark, providing a rich, deep flavor.
- White chocolate chips: Adds a creamy sweetness and contrast to the dark chocolate.
- Candy eyes: These playful decorations bring the Halloween spirit to life!
- Halloween sprinkles: A fun and colorful touch that makes the bark festive.
Optional Add-Ins
- Chopped nuts: For a crunchy texture, consider adding almonds or pecans.
- Mini marshmallows: These can add a chewy element and extra sweetness.
- Other Halloween candies: M&Ms, gummy worms, or candy corn can be fun additions.
Ingredient Notes
- Substitutions: You can use milk chocolate chips instead of dark chocolate for a sweeter flavor.
- Recommended brands: Look for high-quality chocolate chips like Ghirardelli or Guittard for the best taste.
- Fresh vs frozen: Use fresh chocolate chips for melting; frozen ones may not melt evenly.
Kitchen Equipment
- Baking sheet: A standard size works well; you can also use a large platter.
- Parchment paper: This prevents sticking; aluminum foil can be a substitute.
- Microwave-safe bowls: Any heatproof bowl will do, but glass is ideal.
- Spatula: A silicone spatula is great for spreading chocolate.
- Toothpick: For swirling the chocolates; a skewer or fork can work too.
How to Make Halloween Bark with Candy Eyes
Step 1: Prepare the Baking Sheet
Start by lining a baking sheet with parchment paper. This will make it easy to remove the bark later. If you don’t have parchment paper, aluminum foil can work in a pinch, but be sure to grease it lightly to prevent sticking.
Step 2: Melt the Dark Chocolate
In a microwave-safe bowl, add the dark chocolate chips. Microwave them in 30-second intervals, stirring in between, until the chocolate is completely melted and smooth. This usually takes about 1 to 2 minutes. Be careful not to overheat, as chocolate can burn easily!
Step 3: Spread the Dark Chocolate
Once melted, pour the dark chocolate onto the prepared baking sheet. Use a spatula to spread it into an even layer, about 1/4 inch thick. Make sure it covers the entire surface of the baking sheet for a uniform bark.
Step 4: Melt and Drizzle the White Chocolate
Next, melt the white chocolate chips in a separate microwave-safe bowl, following the same method as before. Once melted, drizzle the white chocolate over the dark chocolate layer. You can use a spoon or a piping bag for more control.
Step 5: Swirl the Chocolates Together
Take a toothpick and gently swirl it through the two layers of chocolate. This creates a beautiful marbled effect. Don’t overdo it; a few swirls will give you that lovely design without mixing the chocolates completely.
Step 6: Add Candy Eyes and Sprinkles
Immediately sprinkle the candy eyes and Halloween sprinkles over the top of the chocolate. Press them down slightly to ensure they stick. This is where the fun begins! Get creative with the placement of the candy eyes for a spooky look.
Step 7: Chill and Break into Pieces
Place the baking sheet in the refrigerator for about 30 minutes, or until the chocolate is fully set. Once firm, remove it from the fridge and break the bark into pieces. You can use your hands or a sharp knife for this. Enjoy your festive Halloween treat!
Expert Tips for Success
- Use High-Quality Chocolate: Opt for premium chocolate chips for the best flavor and smooth melting.
- Work Quickly with Toppings: Add your candy eyes and sprinkles right after swirling the chocolates to ensure they stick.
- Keep Chocolate at the Right Temperature: Avoid overheating the chocolate; it should be melted but not too hot to touch.
- Customize with Favorite Candies: Feel free to mix in your family’s favorite candies for a personal touch.
- Store Properly for Freshness: Keep the bark in an airtight container to maintain its crispness and flavor.
Recipe Variations for Halloween Bark with Candy Eyes
Healthier Version
- Use dark chocolate with a higher cocoa content for less sugar.
- Incorporate dried fruits like cranberries or raisins for natural sweetness.
- Replace candy eyes with yogurt-covered raisins for a healthier topping.
Vegan Version
- Choose dairy-free chocolate chips for both dark and white chocolate layers.
- Use coconut oil to help with melting and give a smooth texture.
- Top with vegan-friendly sprinkles or omit them altogether.
Nut-Free Version
- Ensure all chocolate and toppings are certified nut-free.
- Skip any nut add-ins and focus on colorful candies and sprinkles.
- Use seeds like pumpkin or sunflower seeds for a crunchy texture instead.
Colorful Candy Version
- Mix in a variety of colorful candies like M&Ms or Skittles for a vibrant look.
- Use seasonal candies like candy corn or gummy worms for a festive touch.
- Drizzle melted colored candy melts over the top for extra flair.
Seasonal Flavor Version
- Add a pinch of cinnamon or nutmeg to the melted chocolate for a fall flavor.
- Incorporate pumpkin spice-flavored candies for a seasonal twist.
- Use peppermint extract in the white chocolate for a wintery variation.
What to Serve With Halloween Bark with Candy Eyes
Side Dishes
- Serve with popcorn for a fun movie night treat.
- Pair with apple slices for a refreshing contrast.
- Offer a cheese platter for a savory balance.
Drinks
- Hot apple cider adds a cozy touch.
- Serve with spooky-themed mocktails for the kids.
- Pair with a rich hot chocolate for a sweet indulgence.
Presentation Ideas
- Display on a festive Halloween platter.
- Use colorful cupcake liners for individual servings.
- Decorate with mini pumpkins for a seasonal vibe.
Storage Instructions
Room Temperature
- Store the Halloween bark in an airtight container at room temperature for up to one week.
- Keep it in a cool, dry place away from direct sunlight to maintain its freshness.
Refrigerator
- If you prefer a firmer texture, you can store the bark in the refrigerator.
- Make sure it’s in an airtight container to prevent it from absorbing any odors.
- It will last for about two weeks in the fridge.
Freezer
- For longer storage, freeze the bark in a single layer, wrapped tightly in plastic wrap and then in foil.
- It can be frozen for up to three months.
- When ready to enjoy, let it thaw in the refrigerator before serving.
Reheating Tips
- There’s no need to reheat the bark, as it’s best enjoyed chilled or at room temperature.
- If it has softened, simply place it in the refrigerator for a short time to firm up again.
Common Mistakes to Avoid
- Not using parchment paper: Skipping this step can make it difficult to remove the bark from the baking sheet.
- Overheating the chocolate: Melting chocolate too quickly can cause it to seize or burn, ruining the texture.
- Not adding toppings quickly enough: If you wait too long to add candy eyes and sprinkles, they won’t stick to the chocolate.
- Using low-quality chocolate: Cheap chocolate can lead to a less flavorful bark, so opt for high-quality brands for the best results.
FAQs about Halloween Bark with Candy Eyes
Can I use different types of chocolate?
Absolutely! You can substitute dark chocolate with milk chocolate for a sweeter flavor. White chocolate can also be replaced with a dairy-free option if you’re looking for a vegan version. Just keep in mind that the flavor and texture may vary slightly based on your choices.
How long does Halloween Bark last?
This delightful treat can last up to one week at room temperature when stored in an airtight container. If you keep it in the refrigerator, it can last for about two weeks. For longer storage, consider freezing it, which can extend its life up to three months!
Can I make this treat ahead of time?
Yes! One of the best things about this Halloween Bark with Candy Eyes is that it can be made ahead of time. You can prepare it a few days in advance and store it in an airtight container until you’re ready to serve. This makes it a perfect option for busy schedules!
What are some fun variations I can try?
There are so many fun variations to explore! You can add chopped nuts for crunch, use seasonal candies like candy corn, or even incorporate flavored extracts like peppermint or pumpkin spice. Get creative with your toppings and make it your own!
Recipe Card for Halloween Bark with Candy Eyes
| Prep Time | 15 minutes |
|---|---|
| Cook Time | 5 minutes |
| Total Time | 50 minutes |
| Servings | 12 servings |
| Calories | 150 per piece |
Ingredients
- 12 oz dark chocolate chips
- 12 oz white chocolate chips
- 1 cup candy eyes
- 1/2 cup Halloween sprinkles
Instructions
- Line a baking sheet with parchment paper.
- Melt the dark chocolate chips in a microwave-safe bowl, stirring every 30 seconds until smooth.
- Pour the melted dark chocolate onto the prepared baking sheet and spread it into an even layer.
- Melt the white chocolate chips in a separate bowl and drizzle over the dark chocolate.
- Use a toothpick to swirl the two chocolates together for a marbled effect.
- Immediately sprinkle candy eyes and Halloween sprinkles over the top.
- Refrigerate for about 30 minutes or until set.
- Break into pieces and serve.
Notes
- Store in an airtight container at room temperature.
- Feel free to customize with your favorite Halloween candies.
- Make sure to use high-quality chocolate for the best flavor.
Halloween Bark with Candy Eyes: A Sweet Treat for All Occasions
This Halloween Bark with Candy Eyes is more than just a dessert; it’s a way to create sweet memories with your loved ones. Its vibrant colors and delightful flavors make it a perfect addition to any Halloween celebration. Whether you’re hosting a party or enjoying a cozy night in, this treat is sure to bring smiles all around. I encourage you to try this easy recipe and share your experiences! If you loved it, please leave a review or comment below. I can’t wait to hear how your Halloween bark turns out!
PrintHalloween Bark with Candy Eyes: Make Sweet Memories Fast!

A quick and easy Halloween treat featuring chocolate bark topped with colorful candy eyes.
- Prep Time: 15 minutes
- Cook Time: 5 minutes
- Total Time: 50 minutes
- Yield: 12 servings 1x
- Category: Dessert
- Method: No-Bake
- Cuisine: American
- Diet: Vegetarian
Ingredients
- 12 oz dark chocolate chips
- 12 oz white chocolate chips
- 1 cup candy eyes
- 1/2 cup Halloween sprinkles
Instructions
- Line a baking sheet with parchment paper.
- Melt the dark chocolate chips in a microwave-safe bowl, stirring every 30 seconds until smooth.
- Pour the melted dark chocolate onto the prepared baking sheet and spread it into an even layer.
- Melt the white chocolate chips in a separate bowl and drizzle over the dark chocolate.
- Use a toothpick to swirl the two chocolates together for a marbled effect.
- Immediately sprinkle candy eyes and Halloween sprinkles over the top.
- Refrigerate for about 30 minutes or until set.
- Break into pieces and serve.
Notes
- Store in an airtight container at room temperature.
- Feel free to customize with your favorite Halloween candies.
- Make sure to use high-quality chocolate for the best flavor.
Nutrition
- Serving Size: 1 piece
- Calories: 150
- Sugar: 10g
- Sodium: 30mg
- Fat: 8g
- Saturated Fat: 5g
- Unsaturated Fat: 2g
- Trans Fat: 0g
- Carbohydrates: 18g
- Fiber: 1g
- Protein: 2g
- Cholesterol: 0mg
About the Author

Marianne
kitchen guide and fellow food
Hi, we’re Marianne Hi there, and welcome to Recipes Days! I’m Marianne, your kitchen guide and fellow food lover. If you’ve ever felt overwhelmed by complicated recipes or thought, “I don’t have time to cook something good,” I’ve been there too. That’s why Recipes Days exists—to make cooking feel effortless, fun, and full of flavor, no matter your experience level.