
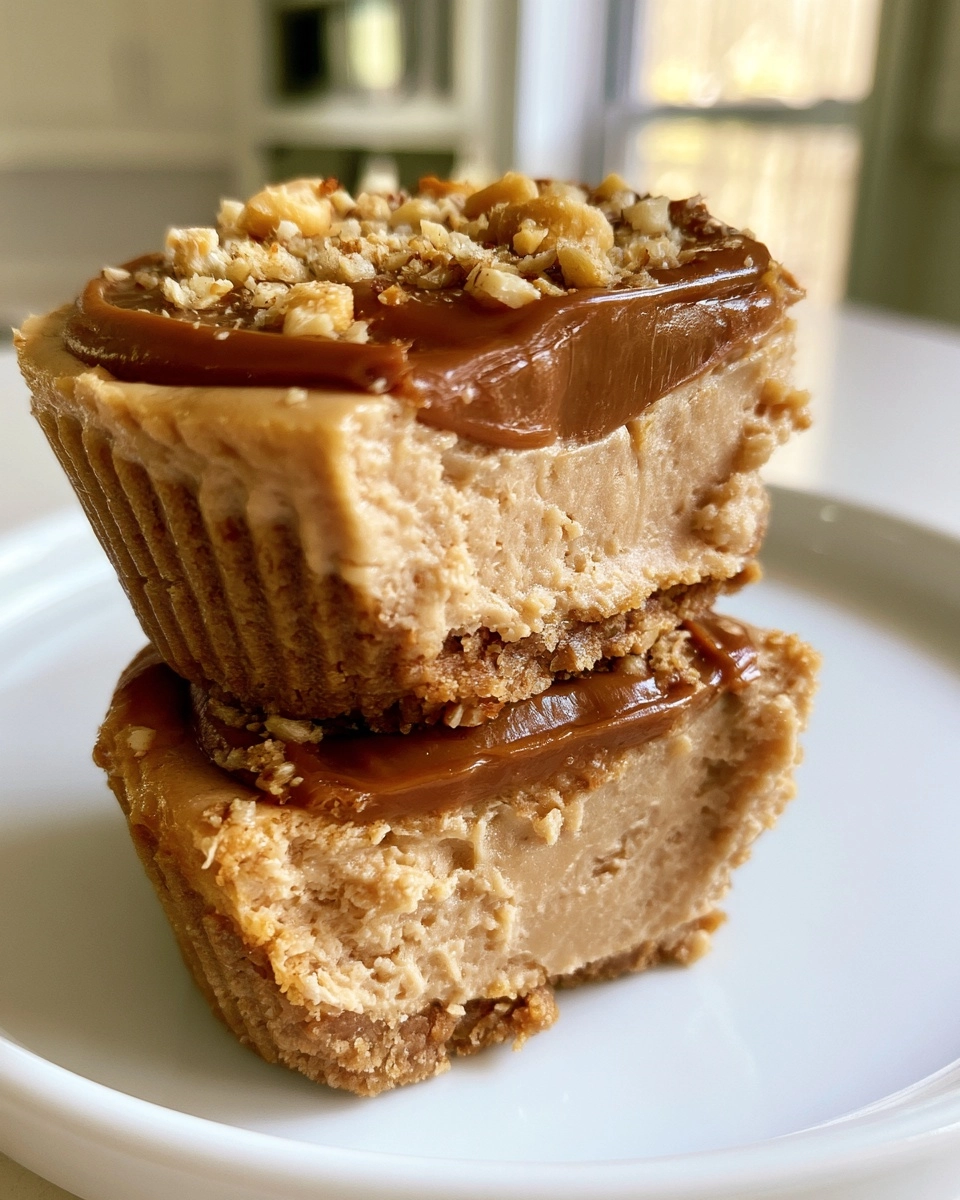
Peanut Butter Protein Cheesecake Cups
Are you looking for a quick solution to satisfy your sweet tooth without the guilt? These Peanut Butter Protein Cheesecake Cups are just what you need! They’re creamy, rich, and packed with protein, making them a perfect treat for busy moms and professionals alike. Whether it’s a family gathering, a post-workout snack, or a delightful dessert for a special occasion, these cups will impress everyone. With a luscious peanut butter flavor and a smooth texture, they’re easy to whip up and require no baking. Plus, they’re a breeze to make, even for beginners!
Why You’ll Love This Peanut Butter Protein Cheesecake Cups
These Peanut Butter Protein Cheesecake Cups are a delightful treat that everyone will adore! They’re incredibly easy to make, so even the busiest of moms can whip them up in no time. The rich, creamy flavor of peanut butter combined with a hint of sweetness makes them irresistible. Plus, they’re family-friendly, appealing to both kids and adults. Best of all, you can make them ahead of time, making them a perfect option for meal prep or last-minute gatherings!
Easy to Make
With just a few simple steps, you’ll have these delicious cups ready to chill. No baking required!
Delicious Flavor
The combination of peanut butter and cream cheese creates a rich, satisfying taste that feels indulgent without the guilt.
Family-Friendly
These cups are a hit with kids and adults alike, making them perfect for family gatherings or parties.
Make-Ahead Friendly
Prepare them in advance and store them in the fridge for a quick, healthy dessert whenever you need it!
Ingredients for Peanut Butter Protein Cheesecake Cups
Main Ingredients
- Cream cheese: The base of our cheesecake cups, providing a creamy texture.
- Peanut butter: Adds rich flavor and healthy fats, making these cups indulgent yet nutritious.
- Honey or maple syrup: Natural sweeteners that enhance the flavor without overpowering it.
- Protein powder: Boosts the protein content, making these cups a great post-workout snack.
- Vanilla extract: A splash of vanilla adds depth and warmth to the overall flavor.
- Greek yogurt: Contributes creaminess and a tangy flavor while adding extra protein.
- Crushed graham crackers (optional): For a crunchy topping that mimics traditional cheesecake crust.
Optional Add-Ins
- Chocolate chips: For a sweet surprise in every bite.
- Chopped nuts: Adds texture and a nutty flavor.
- Fruit toppings: Fresh berries or banana slices can brighten up the presentation.
Ingredient Notes
- For a vegan version, substitute cream cheese with a plant-based alternative and use maple syrup.
- Choose natural peanut butter without added sugars for a healthier option.
- Greek yogurt can be replaced with dairy-free yogurt for a lactose-free version.
- Fresh ingredients yield the best flavor, but frozen cream cheese can work in a pinch if thawed properly.
Kitchen Equipment
- Mixing bowl: A medium-sized bowl works well for combining ingredients.
- Electric mixer or whisk: An electric mixer makes it easier, but a whisk will do the job.
- Muffin tin: Use a standard muffin tin or silicone molds for easy removal.
- Cupcake liners: Optional, but they help with cleanup and presentation.
How to Make Peanut Butter Protein Cheesecake Cups
Step 1: Prepare the Ingredients
Start by gathering all your ingredients. Make sure the cream cheese is softened to room temperature. This will help it blend smoothly with the peanut butter. If you’re using Greek yogurt, have that ready too. It’s all about making the mixing process easier!
Step 2: Mix or Assemble
In a mixing bowl, combine the softened cream cheese and peanut butter. Use an electric mixer or a whisk to blend them until smooth. Then, add in the honey or maple syrup, protein powder, vanilla extract, and Greek yogurt. Mix everything together until it’s well combined. You want a creamy, thick mixture that’s free of lumps.
Step 3: Line the Muffin Tin
Next, take your muffin tin and line it with cupcake liners. This step is optional, but it makes for easy removal later. If you’re using silicone molds, you can skip this step. Just make sure they’re clean and ready to go!
Step 4: Fill the Cups
Now it’s time to fill those cups! Spoon the cheesecake mixture into each lined muffin cup, filling them about three-quarters full. This allows room for any toppings you might want to add later. If you’re using crushed graham crackers, sprinkle a little on top of each cup for that classic cheesecake crunch.
Step 5: Refrigerate Until Set
Place the muffin tin in the refrigerator and let the cheesecake cups chill for at least two hours. This step is crucial as it allows the cups to set properly. You’ll know they’re ready when they feel firm to the touch. If you can wait, letting them chill overnight will enhance the flavors even more!
Step 6: Serve and Enjoy
Once your cheesecake cups are set, it’s time to enjoy! Carefully peel away the cupcake liners and serve them chilled. These cups are perfect for a quick snack, a post-workout treat, or a delightful dessert after dinner. Don’t forget to share with family and friends—they’ll be asking for seconds!
Expert Tips for Success
- Use Fresh Ingredients: Fresh cream cheese and peanut butter yield the best flavor and texture.
- Don’t Overmix: Mix just until combined to keep the texture light and creamy.
- Measure Accurately: Use measuring cups and spoons for precise ingredient amounts.
- Chill Properly: Ensure the cups are fully set by chilling them for at least two hours.
- Common Pro Tips: For a smoother texture, blend the mixture longer, and consider using a food processor.
Recipe Variations
Healthier Version
- Use low-fat cream cheese and natural peanut butter to reduce calories and fat.
- Replace honey or maple syrup with a sugar-free sweetener like stevia or erythritol.
Vegan Version
- Substitute cream cheese with a plant-based cream cheese alternative.
- Use maple syrup as the sweetener and ensure your protein powder is vegan-friendly.
Gluten-Free Version
- Ensure that the graham crackers are gluten-free or omit them altogether.
- Check that your protein powder is certified gluten-free.
Chocolate Lovers Version
- Add cocoa powder to the mixture for a chocolatey twist.
- Top with mini chocolate chips or a drizzle of melted dark chocolate before serving.
Nut-Free Version
- Replace peanut butter with sun butter or soy nut butter for a nut-free alternative.
- Ensure all other ingredients are free from cross-contamination with nuts.
What to Serve With Peanut Butter Protein Cheesecake Cups
Side Dishes
- Fresh fruit salad: A light and refreshing complement to the rich cheesecake cups.
- Veggie sticks with hummus: A healthy snack that balances the sweetness of the cups.
Sauces and Toppings
- Chocolate sauce: Drizzle over the cups for an extra indulgent touch.
- Whipped cream: A dollop adds a creamy finish that pairs beautifully.
Drinks
- Herbal tea: A soothing option that complements the dessert without overpowering it.
- Almond milk smoothie: A nutritious drink that enhances the protein content.
Desserts
- Dark chocolate squares: A small piece can satisfy chocolate cravings without guilt.
- Frozen yogurt: A light and creamy dessert that pairs well with the cheesecake cups.
Storage Instructions
Refrigerator
- Store the cheesecake cups in an airtight container in the refrigerator.
- They will stay fresh for up to one week, making them a great make-ahead treat.
Freezer
- If you want to keep them longer, you can freeze the cheesecake cups.
- Wrap each cup individually in plastic wrap and place them in a freezer-safe container.
- They can be frozen for up to three months. Just remember to label the container!
Reheating
- These cheesecake cups are best served chilled, so there’s no need to reheat them.
- Simply take them out of the fridge or freezer and let them sit at room temperature for a few minutes before serving.
Common Mistakes to Avoid
- Using cold cream cheese: Make sure your cream cheese is softened to room temperature for a smooth mixture.
- Overfilling the cups: Fill each cup only three-quarters full to allow for expansion and toppings.
- Skipping the chilling time: Don’t rush this step; letting the cups chill properly is key to achieving the right texture.
- Not tasting the mixture: Always taste your mixture before chilling to adjust sweetness or flavor as needed.
FAQs about Peanut Butter Protein Cheesecake Cups
Can I use a different nut butter?
Absolutely! You can substitute peanut butter with almond butter, cashew butter, or even sunflower seed butter for a nut-free option. Just keep in mind that the flavor will change slightly, but it will still be delicious!
How long do these cheesecake cups last?
These Peanut Butter Protein Cheesecake Cups can be stored in the refrigerator for up to one week. Just make sure to keep them in an airtight container to maintain their freshness!
Can I freeze the cheesecake cups?
Yes, you can freeze these cheesecake cups! Wrap each cup individually in plastic wrap and place them in a freezer-safe container. They can be frozen for up to three months. Just remember to let them thaw in the refrigerator before serving.
What can I substitute for cream cheese?
If you’re looking for a dairy-free option, you can use a plant-based cream cheese alternative. Silken tofu blended until smooth is another great substitute that will keep the texture creamy while adding protein!
Recipe Card
| Prep Time | 15 minutes |
|---|---|
| Cook Time | 0 minutes |
| Total Time | 2 hours 15 minutes |
| Servings | 12 cups |
| Calories | 150 per cup |
Ingredients
- 1 cup cream cheese, softened
- 1/2 cup peanut butter
- 1/4 cup honey or maple syrup
- 1/2 cup protein powder
- 1 teaspoon vanilla extract
- 1/4 cup Greek yogurt
- 1/4 cup crushed graham crackers (optional)
Instructions
- In a mixing bowl, combine the softened cream cheese and peanut butter until smooth.
- Add honey or maple syrup, protein powder, vanilla extract, and Greek yogurt. Mix until well combined.
- Line a muffin tin with cupcake liners.
- Spoon the mixture into the lined muffin tin, filling each cup about 3/4 full.
- If desired, sprinkle crushed graham crackers on top of each cup.
- Refrigerate for at least 2 hours or until set.
- Serve chilled and enjoy your guilt-free indulgence!
Notes
- For a vegan version, substitute cream cheese with a plant-based alternative and use maple syrup.
- These cups can be stored in the refrigerator for up to a week.
- Feel free to add chocolate chips or nuts for extra flavor and texture.
Indulge in Peanut Butter Protein Cheesecake Cups
These Peanut Butter Protein Cheesecake Cups are not just a dessert; they’re a delightful experience that brings joy to every bite! With their creamy texture and rich peanut butter flavor, they satisfy your sweet cravings without the guilt. Perfect for busy days or special occasions, these cups are sure to impress your family and friends. I encourage you to give this recipe a try and share your thoughts! Your feedback means the world to me, so please leave a review or comment below. Happy indulging!
PrintPeanut Butter Protein Cheesecake Cups for Guilt-Free Indulgence!
Delicious and guilt-free peanut butter protein cheesecake cups that satisfy your sweet tooth while providing a healthy dose of protein.
- Prep Time: 15 minutes
- Cook Time: 0 minutes
- Total Time: 2 hours 15 minutes
- Yield: 12 cups 1x
- Category: Dessert
- Method: No-bake
- Cuisine: American
- Diet: Low Calorie
Ingredients
- 1 cup cream cheese, softened
- 1/2 cup peanut butter
- 1/4 cup honey or maple syrup
- 1/2 cup protein powder
- 1 teaspoon vanilla extract
- 1/4 cup Greek yogurt
- 1/4 cup crushed graham crackers (optional)
Instructions
- In a mixing bowl, combine the softened cream cheese and peanut butter until smooth.
- Add honey or maple syrup, protein powder, vanilla extract, and Greek yogurt. Mix until well combined.
- Line a muffin tin with cupcake liners.
- Spoon the mixture into the lined muffin tin, filling each cup about 3/4 full.
- If desired, sprinkle crushed graham crackers on top of each cup.
- Refrigerate for at least 2 hours or until set.
- Serve chilled and enjoy your guilt-free indulgence!
Notes
- For a vegan version, substitute cream cheese with a plant-based alternative and use maple syrup.
- These cups can be stored in the refrigerator for up to a week.
- Feel free to add chocolate chips or nuts for extra flavor and texture.
Nutrition
- Serving Size: 1 cup
- Calories: 150
- Sugar: 5g
- Sodium: 150mg
- Fat: 10g
- Saturated Fat: 3g
- Unsaturated Fat: 7g
- Trans Fat: 0g
- Carbohydrates: 10g
- Fiber: 1g
- Protein: 8g
- Cholesterol: 30mg
About the Author

Marianne
kitchen guide and fellow food
Hi, we’re Marianne Hi there, and welcome to Recipes Days! I’m Marianne, your kitchen guide and fellow food lover. If you’ve ever felt overwhelmed by complicated recipes or thought, “I don’t have time to cook something good,” I’ve been there too. That’s why Recipes Days exists—to make cooking feel effortless, fun, and full of flavor, no matter your experience level.


