
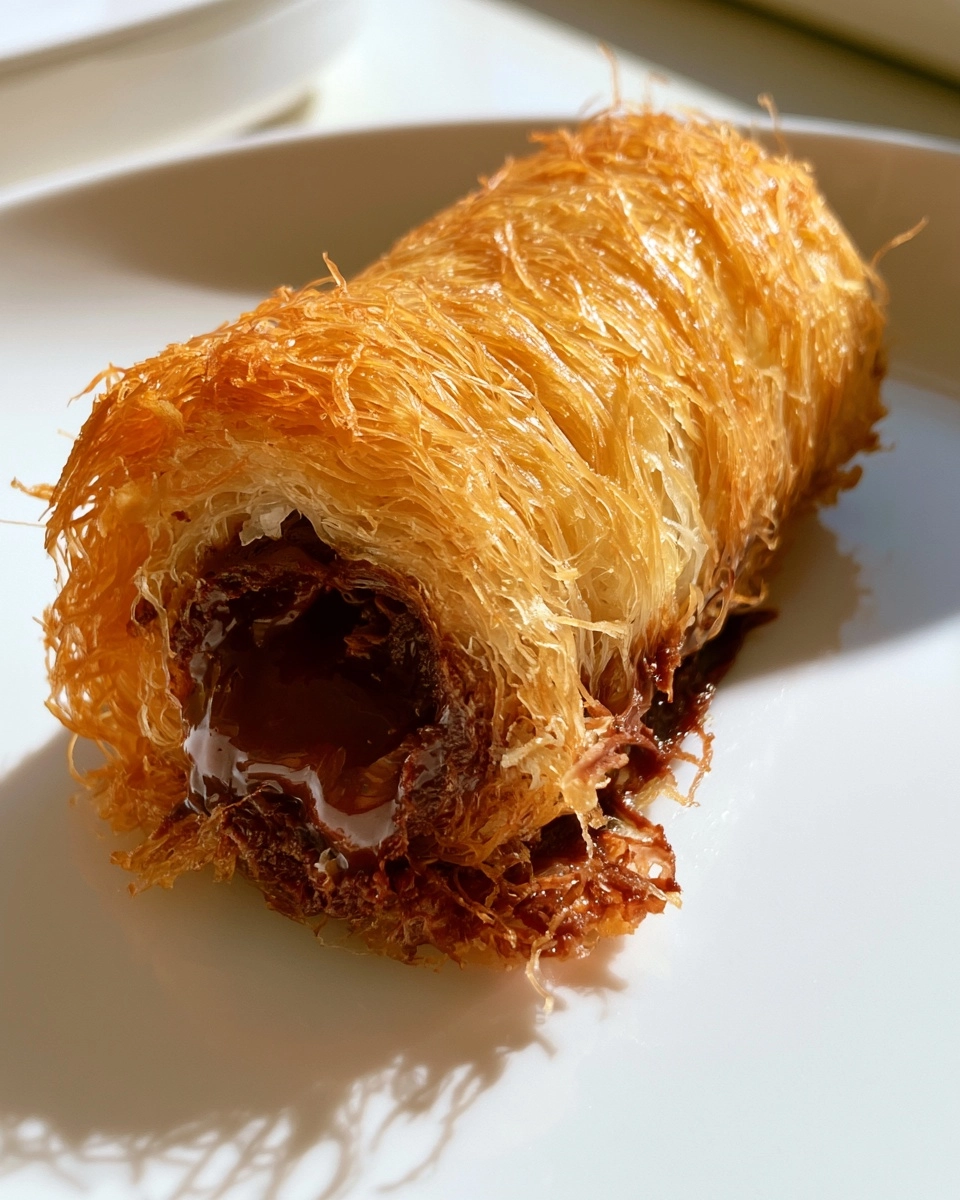
These Crispy Kataifi Chocolate Rolls Are All About the Crunch
Are you looking for a delightful dessert that’s both impressive and easy to whip up? These Crispy Kataifi Chocolate Rolls Are All About the Crunch! Imagine the satisfying crunch of kataifi pastry enveloping a rich, gooey chocolate filling. Perfect for family gatherings, holiday celebrations, or simply a sweet treat after dinner, these rolls are sure to please everyone. With a delightful combination of textures and flavors, they’re a breeze to make, even for busy moms and professionals. Trust me, once you try these, they’ll become a go-to dessert in your kitchen!
Why You’ll Love These Crispy Kataifi Chocolate Rolls Are All About the Crunch
These Crispy Kataifi Chocolate Rolls Are All About the Crunch for so many reasons! First, they’re incredibly easy to make, even for those who might not consider themselves bakers. The delicious flavor of rich chocolate paired with the crispy texture of kataifi pastry is simply irresistible. Plus, they’re family-friendly, making them a hit with both kids and adults alike. And if you’re short on time, these rolls are make-ahead friendly, allowing you to prepare them in advance for any occasion!
Easy to Make
With just a few simple steps, you can create these delightful rolls without any fuss. The process is straightforward, making it perfect for busy days.
Delicious Flavor
The combination of rich dark chocolate and the unique crunch of kataifi pastry creates a flavor explosion that’s hard to resist.
Family-Friendly
These rolls are a hit with everyone, from picky eaters to chocolate lovers. They’re perfect for family gatherings or a sweet treat after dinner.
Make-Ahead Friendly
You can prepare these rolls ahead of time, making them a great option for parties or busy weeknights. Just bake them when you’re ready to serve!
Ingredients These Crispy Kataifi Chocolate Rolls Are All About the Crunch
Main Ingredients
- Kataifi pastry: This shredded phyllo dough is the star of the show, providing that delightful crunch.
- Dark chocolate: Rich and decadent, it forms the luscious filling that melts in your mouth.
- Unsalted butter: Adds moisture and helps the kataifi pastry crisp up beautifully.
- Powdered sugar: Sweetens the chocolate filling and gives it a smooth texture.
- Vanilla extract: Enhances the overall flavor, adding a warm, aromatic note.
- Salt: Just a pinch balances the sweetness and elevates the chocolate flavor.
Optional Add-Ins
- Nuts: Chopped walnuts or pistachios can add a delightful crunch and flavor.
- Dried fruits: Raisins or chopped apricots can introduce a sweet, chewy contrast.
- Spices: A dash of cinnamon or nutmeg can add warmth and depth to the filling.
Ingredient Notes
- Substitutions: If you prefer milk chocolate, feel free to swap it in for a sweeter taste.
- Recommended brands: Look for high-quality dark chocolate, like Ghirardelli or Lindt, for the best flavor.
- Fresh vs frozen: Kataifi pastry can be found in the freezer section of most grocery stores. Thaw it before use for the best results.
Kitchen Equipment
- Baking sheet: A standard baking sheet works well, but a rimmed sheet can prevent spills.
- Parchment paper: Use this to line your baking sheet for easy cleanup.
- Mixing bowl: Any medium-sized bowl will do for mixing the filling.
- Spatula: A rubber spatula is great for mixing and scooping.
- Measuring cups and spoons: Essential for accurate ingredient measurements.
How to Make These Crispy Kataifi Chocolate Rolls Are All About the Crunch
Step 1: Prepare the Ingredients
Start by gathering all your ingredients. Make sure your kataifi pastry is thawed and ready to use. Preheat your oven to 180°C (350°F) so it’s hot and ready for baking. Chop the dark chocolate into small pieces to help it melt evenly. This step is crucial for achieving that gooey filling we all love!
Step 2: Mix or Assemble
In a mixing bowl, combine the chopped chocolate, melted butter, powdered sugar, vanilla extract, and a pinch of salt. Stir until everything is well blended and smooth. This chocolate mixture is the heart of your rolls, so make sure it’s creamy and delicious. Now, take a handful of kataifi pastry and spread it out on a clean surface. Place a spoonful of the chocolate mixture at one end of the kataifi. Roll it up tightly, making sure the chocolate is well enclosed. Repeat this process until you’ve used all the pastry and filling.
Step 3: Cook or Bake
Line a baking sheet with parchment paper to prevent sticking. Place your rolled kataifi on the sheet, leaving a little space between each roll. Bake in the preheated oven for 15-20 minutes. Keep an eye on them! You want them to turn golden brown and crispy. When they look beautifully browned, they’re ready to come out!
Step 4: Finish and Garnish
Once your rolls are out of the oven, let them cool for a few minutes. This will help them firm up a bit. For a lovely presentation, dust the rolls with powdered sugar. It adds a touch of elegance and sweetness. You can also drizzle some melted chocolate on top for an extra indulgent treat!
Step 5: Serve
These Crispy Kataifi Chocolate Rolls are best served warm, but they’re also delicious at room temperature. Arrange them on a platter and watch your family and friends dive in! They make a fantastic dessert for gatherings, or simply enjoy them as a sweet treat after dinner. Don’t forget to share your experience with me!
Expert Tips for Success
- Use Fresh Ingredients: Fresh kataifi pastry and high-quality chocolate make a world of difference in flavor.
- Don’t Overcook: Keep an eye on the rolls while baking; you want them golden brown, not burnt.
- Measure Accurately: Use measuring cups and spoons for precise ingredient amounts to ensure the best results.
- Follow Timing Carefully: Stick to the recommended baking time for perfect texture and crunch.
- Common Pro Tips: If you want extra crunch, consider brushing the kataifi with a bit more melted butter before baking.
Recipe Variations
Healthier Version
- Use dark chocolate with a higher cocoa content for less sugar.
- Substitute coconut oil for butter to reduce saturated fat.
- Incorporate ground flaxseed or chia seeds into the chocolate filling for added fiber.
Vegetarian Version
- This recipe is already vegetarian-friendly, but you can enhance it with plant-based chocolate options.
- Consider adding a layer of fresh fruit, like sliced strawberries or bananas, for a fruity twist.
Gluten-Free Version
- Ensure the kataifi pastry is labeled gluten-free, as some brands may contain gluten.
- Use gluten-free chocolate and check that all other ingredients are gluten-free.
Spicy Version
- Add a pinch of cayenne pepper or chili powder to the chocolate mixture for a surprising kick.
- Incorporate finely chopped jalapeños or a dash of hot sauce for an adventurous flavor.
Extra Indulgent Version
- Mix in a tablespoon of heavy cream into the chocolate filling for a richer texture.
- Top the rolls with a drizzle of caramel sauce or a sprinkle of sea salt for an extra layer of flavor.
What to Serve With These Crispy Kataifi Chocolate Rolls Are All About the Crunch
Side Dishes
- Fresh fruit salad: A light and refreshing contrast to the rich rolls.
- Vanilla ice cream: A scoop of creamy ice cream pairs beautifully with the crunchy texture.
Sauces and Toppings
- Chocolate sauce: Drizzle over the rolls for an extra chocolatey experience.
- Caramel sauce: Adds a sweet, buttery flavor that complements the chocolate.
Drinks
- Mint tea: A refreshing herbal tea that balances the sweetness of the rolls.
- Coffee: A warm cup of coffee enhances the chocolate flavor.
Desserts
- Baklava: Another Middle Eastern treat that pairs well with the kataifi rolls.
- Chocolate mousse: For chocolate lovers, this creamy dessert is a perfect match.
Storage Instructions
Refrigerator
- Store leftover kataifi chocolate rolls in an airtight container in the refrigerator.
- They will stay fresh for up to 3 days, but they’re best enjoyed within the first couple of days.
Freezer
- To freeze, place the rolls in a single layer on a baking sheet and freeze until solid.
- Once frozen, transfer them to a freezer-safe bag or container, separating layers with parchment paper.
- They can be stored in the freezer for up to 2 months.
Reheating
- To reheat, preheat your oven to 180°C (350°F).
- Place the rolls on a baking sheet and heat for about 10 minutes, or until warmed through and crispy.
- A microwave can be used, but it may make the rolls less crispy; heat in short intervals to avoid sogginess.
Common Mistakes to Avoid
- Not thawing the kataifi pastry properly: Make sure it’s fully thawed before using to achieve the best texture.
- Overfilling the rolls: Too much filling can cause the rolls to burst open while baking, so stick to a spoonful.
- Skipping the parchment paper: This can lead to sticking and make cleanup a hassle, so don’t skip this step!
- Not monitoring the baking time: Keep an eye on the rolls to prevent burning; they should be golden brown, not dark brown.
FAQs about These Crispy Kataifi Chocolate Rolls Are All About the Crunch
Can I use different fillings for the rolls?
Absolutely! These Crispy Kataifi Chocolate Rolls Are All About the Crunch, but you can get creative with the fillings. Consider using nut butters, fruit preserves, or even a mix of chocolate and nuts for added texture. Just make sure the filling is thick enough to stay inside the rolls while baking.
How do I know when the rolls are done baking?
You’ll know the rolls are done when they turn a beautiful golden brown and are crispy to the touch. Keep an eye on them during the last few minutes of baking to avoid overcooking. A light tap should sound crunchy, and the aroma will be heavenly!
Can I freeze these rolls for later?
Yes, you can freeze these rolls! Just make sure to freeze them in a single layer first, then transfer them to a freezer-safe bag. They can be stored for up to 2 months. When you’re ready to enjoy them, simply reheat in the oven for that fresh-out-of-the-oven crunch!
Recipe Card
| Prep Time | 20 minutes |
|---|---|
| Cook Time | 20 minutes |
| Total Time | 40 minutes |
| Servings | 12 rolls |
| Calories | 150 per roll |
Ingredients
- Kataifi pastry
- Dark chocolate, chopped
- Unsalted butter, melted
- Powdered sugar
- Vanilla extract
- Pinch of salt
Instructions
- Preheat the oven to 180°C (350°F).
- In a bowl, mix the chopped chocolate, melted butter, powdered sugar, vanilla extract, and salt until well combined.
- Take a handful of kataifi pastry and spread it out on a clean surface.
- Place a spoonful of the chocolate mixture at one end of the kataifi pastry.
- Roll the kataifi pastry around the chocolate filling tightly.
- Place the rolled kataifi on a baking sheet lined with parchment paper.
- Repeat the process until all the pastry and filling are used.
- Bake in the preheated oven for 15-20 minutes or until golden brown and crispy.
- Let cool slightly before serving.
Notes
- For extra flavor, you can add nuts or dried fruits to the chocolate filling.
- Serve with a dusting of powdered sugar for presentation.
- These rolls can be made ahead of time and stored in an airtight container.
These Crispy Kataifi Chocolate Rolls Are All About the Crunch
These Crispy Kataifi Chocolate Rolls Are All About the Crunch, and I can’t wait for you to experience their delightful charm! With their irresistible combination of textures and flavors, they’re sure to become a favorite in your home. Whether you’re serving them at a family gathering or enjoying them as a sweet treat after dinner, these rolls are bound to impress. I’d love to hear how your rolls turn out, so please leave a review or comment below! Your feedback not only warms my heart but also helps fellow home cooks discover this delicious recipe!
PrintThese Crispy Kataifi Chocolate Rolls Are All About the Crunch – Discover Their Irresistible Delight!

These Crispy Kataifi Chocolate Rolls are a delightful dessert that combines the crunch of kataifi pastry with rich chocolate filling, creating an irresistible treat.
- Prep Time: 20 minutes
- Cook Time: 20 minutes
- Total Time: 40 minutes
- Yield: 12 rolls 1x
- Category: Dessert
- Method: Baking
- Cuisine: Middle Eastern
- Diet: Vegetarian
Ingredients
- 200g kataifi pastry
- 100g dark chocolate, chopped
- 50g unsalted butter, melted
- 50g powdered sugar
- 1 tsp vanilla extract
- Pinch of salt
Instructions
- Preheat the oven to 180°C (350°F).
- In a bowl, mix the chopped chocolate, melted butter, powdered sugar, vanilla extract, and salt until well combined.
- Take a handful of kataifi pastry and spread it out on a clean surface.
- Place a spoonful of the chocolate mixture at one end of the kataifi pastry.
- Roll the kataifi pastry around the chocolate filling tightly.
- Place the rolled kataifi on a baking sheet lined with parchment paper.
- Repeat the process until all the pastry and filling are used.
- Bake in the preheated oven for 15-20 minutes or until golden brown and crispy.
- Let cool slightly before serving.
Notes
- For extra flavor, you can add nuts or dried fruits to the chocolate filling.
- Serve with a dusting of powdered sugar for presentation.
- These rolls can be made ahead of time and stored in an airtight container.
Nutrition
- Serving Size: 1 roll
- Calories: 150
- Sugar: 10g
- Sodium: 50mg
- Fat: 8g
- Saturated Fat: 5g
- Unsaturated Fat: 2g
- Trans Fat: 0g
- Carbohydrates: 18g
- Fiber: 1g
- Protein: 2g
- Cholesterol: 15mg
About the Author

Marianne
kitchen guide and fellow food
Hi, we’re Marianne Hi there, and welcome to Recipes Days! I’m Marianne, your kitchen guide and fellow food lover. If you’ve ever felt overwhelmed by complicated recipes or thought, “I don’t have time to cook something good,” I’ve been there too. That’s why Recipes Days exists—to make cooking feel effortless, fun, and full of flavor, no matter your experience level.


